


If you’re wondering how to make all sides of a Rubik’s Cube match, the answer is to solve the puzzle layer by layer. A standard 3×3 cube has six faces, and the goal is to make each face display one solid color. Completing one face at a time without checking the neighboring colors won’t work.
This guide uses seven steps: make the white cross, solve the white corners, complete the middle layer, form the yellow cross, match the yellow edges, position the yellow corners, and turn those corners into place. You can follow the instructions even if you’ve never solved a cube before.
Understand the Pieces of a Rubik’s Cube
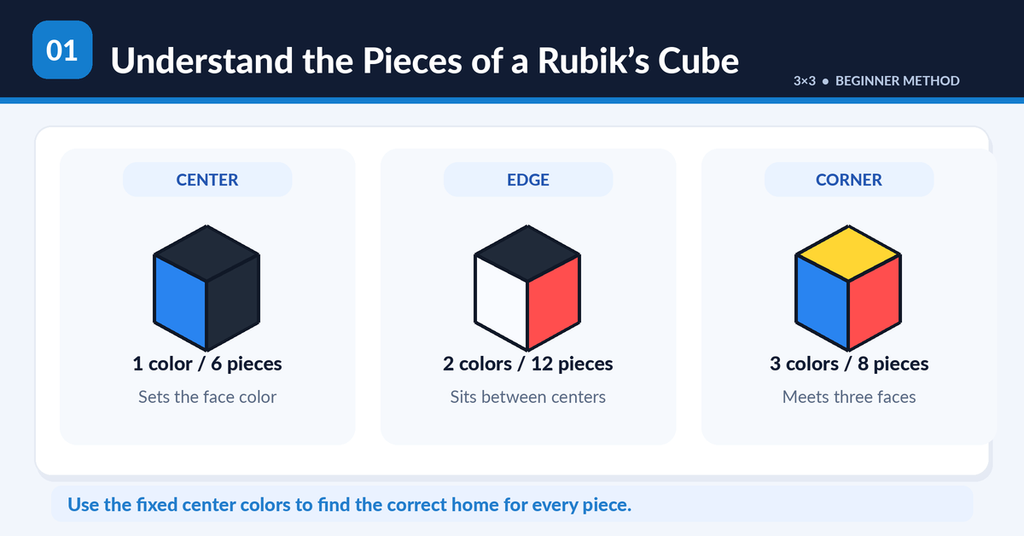
Before making your first move, learn how the pieces fit together.
A standard 3×3 Rubik’s Cube has three types of pieces:
- Centers: Six pieces with one colored sticker each. They identify the color of each face.
- Edges: Twelve pieces with two colored stickers each. They sit between the corners.
- Corners: Eight pieces with three colored stickers each. They connect three neighboring faces.
The centers serve as your reference throughout the solution. For example, a white-red-blue corner belongs where the white, red, and blue faces meet.
On most standard cubes, white is opposite yellow, red is opposite orange, and blue is opposite green. Some puzzles use different arrangements, so check your own centers instead of assuming every cube has the same color scheme.
Why Solving One Side Is Not Enough
One common mistake is trying to make a complete white face without checking the colors around its edges.
Suppose a white-red edge is placed next to the orange center. The white sticker may be in the right face, but the piece is still in the wrong position.
For a correctly solved first layer, the entire white face must be white, and the bottom row of each neighboring side must match its center.
The same rule applies to the white cross. All four white edge pieces must match the centers of the adjacent sides.
Learn the Rubik’s Cube Notation
Rubik’s Cube algorithms are written using letters. Each letter tells you which face to turn.
| Letter | Face |
|---|---|
| U | Up |
| D | Down |
| R | Right |
| L | Left |
| F | Front |
| B | Back |
A letter without a symbol means a 90-degree clockwise turn.
An apostrophe (') means a 90-degree counterclockwise turn. A number 2 means a 180-degree turn.
For example:
Rmeans turn the right face clockwise.R'means turn the right face counterclockwise.R2means turn the right face 180 degrees.U2means turn the top face 180 degrees.
Always judge clockwise and counterclockwise while looking directly at the face being turned.
This matters when using moves such as D' and B', because their directions can appear reversed from your normal viewing angle.
How to Follow a Rubik’s Cube Algorithm
An algorithm is a sequence of moves performed in a specific order.
A common example is:
R U R’ U’
Follow these four moves:
- Turn the right face clockwise.
- Turn the upper face clockwise.
- Turn the right face counterclockwise.
- Turn the upper face counterclockwise.
This is called the right-hand trigger.
Each move must be performed in order. Don’t rotate the entire cube between moves unless the instructions specifically tell you to change its orientation.
An algorithm may temporarily move solved pieces, but the complete sequence is designed to produce a particular result.
Step 1 — Make the White Cross
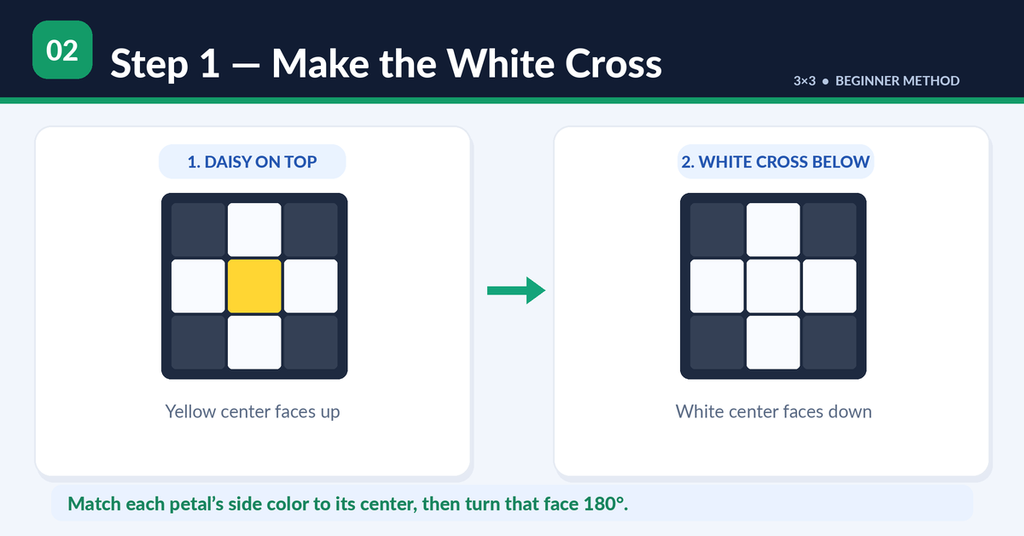
The first goal is to arrange four white edge pieces around the white center, with their other colors matching the neighboring centers.
The daisy method makes this easier.
Start with the yellow center facing upward.
- Find the four edge pieces containing white.
- Move these pieces around the yellow center on the upper face.
- Arrange them so the four white stickers form a daisy around the yellow center.
- Ignore the white corner pieces for now.
- Choose one white petal and look at its second color.
- Turn the upper layer until that second color matches the center on the side beneath it.
- Turn that matching side face 180 degrees to move the white edge to the bottom.
- Repeat for the remaining three petals.
If an empty petal position is needed while building the daisy, turn the upper layer to make room before bringing another white edge upward.
For example, if an edge has white and green stickers, position the green sticker above the green center. Turning that side twice transfers the white sticker to the white-center face.
Continue until all four white edges are correctly placed.
Check your result: The white cross should be on the bottom. Its four side stickers must match the centers beside them.
If the cross looks white but the side colors are wrong, fix those edges before moving on.
Step 2 — Solve the White Corners
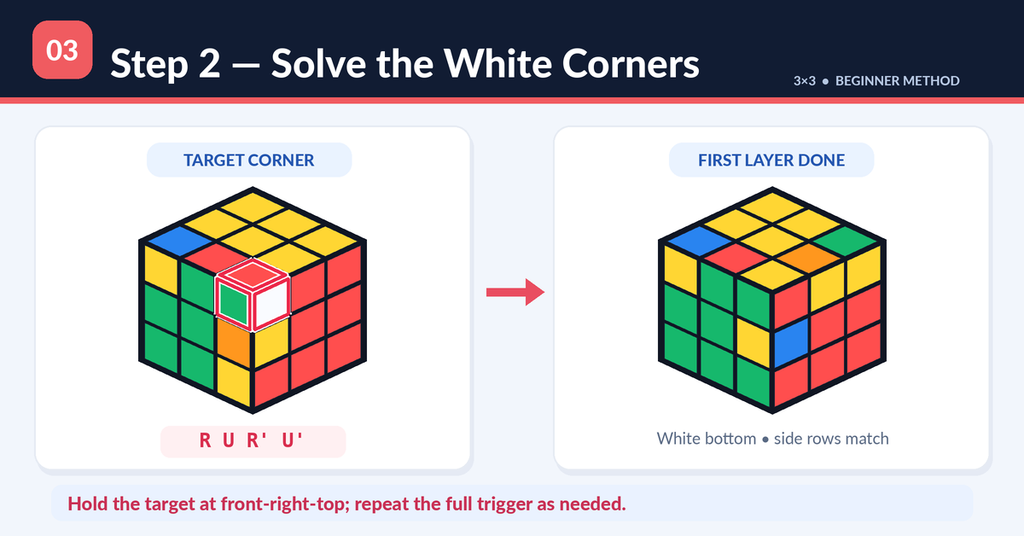
Keep the white center on the bottom and yellow on top.
The next task is to place the four white corners into their correct positions.
Each white corner has two other colors that tell you where it belongs. For example, a white-red-green corner belongs between the white, red, and green centers.
Follow these instructions:
- Find a corner containing white in the upper layer.
- Identify the two other colors.
- Turn the upper layer until the corner is directly above its correct destination.
- Hold the cube so the target corner is at the front-right-top position and its destination is at the front-right-bottom.
- Perform the following algorithm:
R U R’ U’
Repeat this sequence until the corner is correctly inserted, with its white sticker facing downward.
Depending on how the corner is oriented, the algorithm may need one, three, or five repetitions. Check the corner after every complete sequence.
If a white corner is already in the bottom layer but is incorrectly positioned or twisted, hold that corner at the front-right-bottom and perform the same trigger to bring it into the upper layer. Then align it with its proper destination and insert it.
Repeat the process for all four corners.
Check your result: The bottom face should now be completely white. The bottom row of all four side faces must also match their centers.
If the side rows are mismatched, the first layer is not yet solved.
Step 3 — Solve the Middle Layer Edges

With the white layer finished, you can solve the middle layer.
Keep white on the bottom and yellow on top.
The middle layer contains four edge pieces that do not have yellow stickers.
Look at the upper layer and find an edge without yellow. Turn the top until the front sticker of that edge matches the front center.
Then look at the other sticker to determine whether the piece belongs on the left or right.
Insert an edge to the right
Suppose the front center is green and your edge contains green and red. After matching green with the front center, check where the red center is.
If the red center is on the right, use:
U R U’ R’ U’ F’ U F
This sequence inserts the edge into the front-right middle-layer slot.
Insert an edge to the left
If the edge’s other color belongs on the left, use:
U’ L’ U L U F U’ F’
This sequence inserts the edge into the front-left middle-layer slot.
Keep the matched color at the front when performing either algorithm.
What if an edge is stuck in the middle layer?
Sometimes all four upper-layer edges contain yellow, but the middle layer is still incorrect.
This happens when a required edge is in the wrong middle-layer slot or is flipped inside its slot.
Hold the incorrect slot at the front-right or front-left. Use the appropriate insertion algorithm to replace that edge with one from the upper layer.
The incorrect edge will move to the top, where you can align and insert it properly.
Don’t try to pull the piece out or twist it by hand.
Check your result: The entire white face and the bottom two rows of all four side faces should be solved. Only the yellow layer remains unfinished.
Step 4 — Make the Yellow Cross

Keep yellow on top and white on the bottom.
Now focus on the yellow edge stickers. Ignore the yellow corner stickers during this step.
You will see one of four patterns:
- Dot: Only the yellow center faces upward.
- L shape: Two neighboring yellow edges face upward.
- Line: Two opposite yellow edges form a straight line.
- Cross: All four yellow edges face upward.
Use this algorithm:
F R U R’ U’ F’
The way you hold the cube depends on the pattern.
If you see a dot: Perform the algorithm once, then inspect the new pattern.
If you see an L shape: Hold the two yellow edges at the back and left of the upper face. Perform the algorithm. You should get a line.
If you see a line: Hold the line horizontally, running from left to right. Perform the algorithm to make the cross.
If you already have a cross: Move directly to Step 5.
A dot may require three applications in total, while an L shape usually requires two. Check the pattern and adjust the starting position between applications.
Check your result: The top should show a yellow center surrounded by four yellow edge stickers.
The side stickers of those edges may not yet match their centers. That is normal at this stage.
Step 5 — Match the Yellow Cross Edges
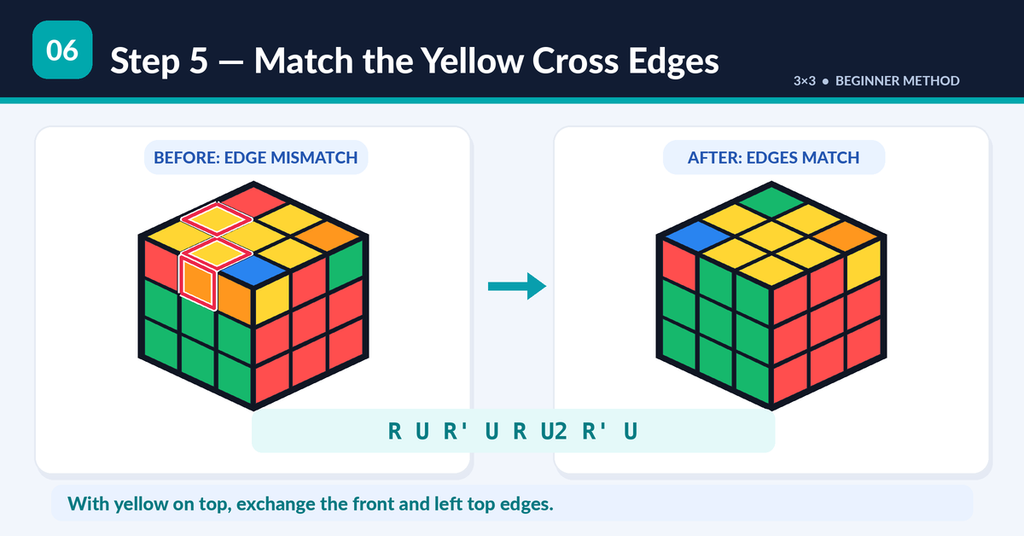
You now have a yellow cross, but some edge pieces may be in the wrong positions.
Keep yellow on top and white on the bottom.
Turn the upper layer and compare each yellow edge’s side sticker with the center directly below it.
If all four match, this step is complete.
Otherwise, use this algorithm to exchange the upper-front and upper-left edge pieces:
R U R’ U R U2 R’ U
Here, U2 means a 180-degree turn of the upper face.
When two neighboring edges need to exchange places:
Hold the cube so the two edges that need to switch are at the front and left. Perform the algorithm once.
The front and left edges exchange positions, while the back and right edges remain in place.
For example, if the yellow-red edge is at the front but belongs on the left, and the edge on the left belongs at the front, this is the correct setup.
When the misplaced edges are opposite:
You cannot exchange two opposite edges directly using this adjacent-edge sequence.
First, perform the algorithm with an incorrect pair at the front and left. Recheck the cube, identify the remaining misplaced edges, and use the algorithm again with the required pair at the front and left.
For more complicated arrangements, move misplaced edges between neighboring positions using the same algorithm. Reorient the whole cube between complete algorithms as needed, keeping yellow on top, and check where each piece belongs after every exchange.
Do not repeat the moves blindly. Compare each edge with its matching center before deciding which positions to exchange next.
Check your result: All four yellow cross edges should now match the side centers. The first two layers must remain solved.
Step 6 — Put the Yellow Corners in the Correct Positions
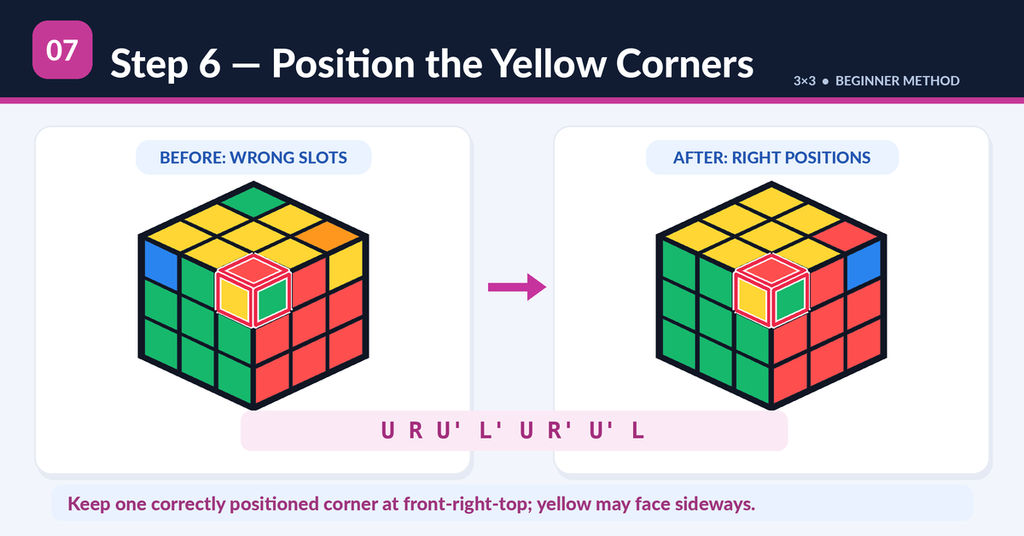
The yellow edges are solved. Next, place the four yellow corners in their proper locations.
At this stage, don’t worry about which direction the yellow stickers face.
A corner is correctly positioned when its three colors match the three centers surrounding its location.
For example, a yellow-red-green corner belongs between the yellow, red, and green centers, even if its yellow sticker faces sideways.
Look for a yellow corner already occupying its correct position.
If you find one, hold the cube so that corner is at the front-right-top.
Use:
U R U’ L’ U R’ U’ L
This algorithm keeps the front-right-top corner in place while moving the other three upper corners.
After completing it, check whether all four corners are now in their proper positions.
If they are not, keep the correctly positioned corner at the front-right-top and perform the sequence again.
If none of the corners is correctly positioned initially, perform the algorithm once from any front orientation. Then find the corner that has moved into its proper position, hold it at the front-right-top, and continue.
Remember that position and orientation are different.
A corner can occupy the correct location while its yellow sticker faces outward.
This step fixes where the corners belong. The next step turns them to face the correct direction.
Check your result: All four yellow corners must be in their proper locations. Some may still have their yellow stickers facing sideways.
Step 7 — Twist the Yellow Corners to Solve the Cube

This is the final stage.
Keep yellow on top and white on the bottom.
All pieces should now be in their correct positions, although one or more yellow corners may still be twisted.
Find an incorrectly oriented yellow corner and place it at the front-right-top position.
Use this four-move algorithm:
R’ D’ R D
Follow these instructions carefully:
- Repeat the algorithm until the yellow sticker of the front-right-top corner faces upward.
- Complete all four moves every time, including the final
D. - Once that corner is correct, turn only the upper layer to bring another incorrectly oriented corner into the front-right-top position.
- Repeat
R' D' R Duntil the new corner’s yellow sticker faces upward. - Continue until all remaining yellow corners are correctly oriented.
- Finally, turn the upper layer if needed to align the side colors.
The working corner usually needs two or four complete repetitions.
Important: Do Not Rotate the Whole Cube
During this step, the white and middle layers may appear scrambled.
Do not try to repair them separately. This temporary change is part of the algorithm.
Keep the cube facing the same direction while working on the corners. Between corners, turn only the upper layer.
Never skip the final D move because a corner appears correct halfway through the sequence.
When all the corners have been oriented correctly and the upper layer is aligned, the displaced pieces will return to their solved positions.
How to Check Whether Your Rubik’s Cube Is Solved
A Rubik’s Cube is solved only when all six faces are correct at the same time.
Check the following:
- The white face contains nine white stickers.
- The yellow face contains nine yellow stickers.
- The red, orange, blue, and green faces are each solid colors.
- Every edge matches both neighboring centers.
- Every corner matches all three surrounding centers.
If all these conditions are satisfied, your cube is solved.
If the yellow face is complete but one of the side colors is mismatched, inspect the edge and corner positions instead of repeating the final corner-twisting algorithm.
Rubik’s Cube Algorithm Cheat Sheet
Keep this table nearby while learning the seven-step method.
| Purpose | Algorithm |
|---|---|
| Insert white corners | R U R' U' |
| Insert middle edge right | U R U' R' U' F' U F |
| Insert middle edge left | U' L' U L U F U' F' |
| Make yellow cross | F R U R' U' F' |
| Match yellow edges | R U R' U R U2 R' U |
| Position yellow corners | U R U' L' U R' U' L |
| Orient yellow corners | R' D' R D |
Each algorithm has a specific purpose and starting position. Read the setup instructions before applying the moves.
Common Rubik’s Cube Mistakes
Even a small turning error can affect several pieces. Here are problems beginners often encounter.
White face solved, but the side colors don’t match
The white pieces were placed without matching their other colors to the centers. Return to the white cross or white corners and correct the positions.
No non-yellow edges are left in the top layer
A required middle-layer edge is trapped in the wrong slot. Use a left or right insertion algorithm to move it into the upper layer.
Yellow cross won’t appear
Check whether you are looking at the yellow edges rather than the corners. Hold the L at the back-left or the line horizontally before using the yellow-cross algorithm.
The cube looks worse after an algorithm
Make sure you completed the entire sequence and used the correct starting position. Check any prime marks you may have missed.
Clockwise and counterclockwise turns are confusing
Look directly at the face named by the move. Remember that an apostrophe reverses its turning direction.
The final yellow corners won’t solve
Make sure the working corner is at the front-right-top. Complete every R' D' R D sequence, then turn only the upper layer to select the next corner.
A solved piece moves out of position
Some algorithms temporarily move other pieces. Complete the sequence before judging the result. If the expected result doesn’t appear, check your setup before continuing.
What If You Forget an Algorithm Halfway Through?
If you know exactly which moves you performed, you can reverse them.
For example, to undo:
R U
Perform:
U’ R’
The moves are reversed in both order and direction.
If you aren’t sure where you stopped, avoid making random turns. Look at the current cube and identify which layers are still solved.
You can often return to the relevant stage without starting again from a completely scrambled cube.
Writing down algorithms or keeping the cheat sheet open will help until the movements become familiar.
Can a Rubik’s Cube Have One Flipped Edge or Twisted Corner?
Certain cube positions cannot occur through normal turns on a properly assembled 3×3 Rubik’s Cube.
Examples include:
- A single flipped edge when every other piece is solved.
- One twisted corner when the rest of the cube is solved.
- Exactly two edge pieces exchanged while everything else remains solved.
- Exactly two corner pieces exchanged while everything else remains solved.
These positions can result from a cube being taken apart and incorrectly reassembled, a corner being physically twisted, or stickers or caps being moved.
Before assuming that the cube is incorrectly assembled, check whether you have overlooked another misplaced piece.
If the puzzle was physically altered, ordinary solving algorithms cannot correct an otherwise isolated impossible state. It may require proper reassembly.
Do not force pieces into different orientations as part of a normal solve.
How Long Does It Take to Learn a Rubik’s Cube?
The time needed for a first solve varies.
Some people complete the puzzle within 30 minutes, while others need an hour or several practice sessions.
Understanding the pieces and memorizing the moves usually takes longer than performing the algorithms themselves.
A good approach is to practice one stage at a time.
First, become comfortable solving the white cross without instructions. Then practice inserting the white corners and middle-layer edges.
Once those stages feel familiar, work on the yellow layer.
You don’t need to memorize every algorithm before finishing your first cube. Following written instructions is fine.
Beginner Method vs CFOP
The layer-by-layer method used in this guide is intended for learning the basic solution.
CFOP is a popular method used by speedcubers who want to solve puzzles more efficiently.
| Feature | Beginner Method | CFOP |
|---|---|---|
| Main goal | Learn a reliable solution | Improve solving speed |
| Difficulty | Beginner | Intermediate to advanced |
| Algorithms | Relatively few | More algorithms |
| First two layers | Corners and edges separately | Corner-edge pairs |
| Last layer | Several smaller stages | OLL and PLL |
| Best starting point | First-time solvers | Solvers with basic experience |
CFOP stands for Cross, First Two Layers, Orientation of the Last Layer, and Permutation of the Last Layer.
Once you can solve the cube consistently, you can learn intuitive F2L, two-look OLL, two-look PLL, and finger tricks to reduce your solving time.
FAQs
How do you make all sides of a Rubik’s Cube the same color?
Solve the puzzle using the layer-by-layer method. Start with the white cross and corners, complete the middle layer, make the yellow cross, arrange the yellow edges and corners, and finally orient the corners. Each completed stage brings the cube closer to having six solid-colored faces.
What is the easiest way to solve a 3×3 Rubik’s Cube?
The beginner layer-by-layer method is a practical starting point. It breaks the puzzle into seven smaller stages and uses a limited number of algorithms. Learning to match pieces with their corresponding center colors is the first skill to practice.
What does R U R’ U’ mean?
It means turning the right face clockwise, the upper face clockwise, the right face counterclockwise, and the upper face counterclockwise. These four moves form the right-hand trigger, which can be used to insert white corners in the beginner method.
How do you solve the first white side correctly?
Make a white cross with all four edge side colors matching their centers. Then insert the white corners into their correct positions. The first layer is solved only when the white face is complete and the bottom row of each neighboring side matches its center.
How do you solve the middle layer of a Rubik’s Cube?
Find an upper-layer edge without yellow and align one of its stickers with the matching side center. Determine whether its other color belongs to the left or right, then use the appropriate insertion algorithm. Repeat for all four middle-layer edges.
How do you make the yellow cross?
Keep yellow on top and use F R U R' U' F'. The starting position depends on whether the yellow edges form a dot, an L, or a line. Hold the L at the back-left or the line horizontally and repeat the algorithm with the proper setup until a yellow cross appears.
Why does my Rubik’s Cube look scrambled during the final step?
The final R' D' R D algorithm temporarily moves pieces in the lower layers. Complete each full four-move sequence and turn only the upper layer between working corners. The affected pieces return to their proper positions once the corner-orientation process is completed correctly.
Can one flipped edge make a Rubik’s Cube impossible to solve?
Yes. A single isolated flipped edge cannot occur through legal turns on a properly assembled 3×3 cube. If every other piece is solved, check whether the puzzle was physically altered or assembled incorrectly.
Can a Rubik’s Cube have only one twisted corner?
Not through ordinary face turns. If every other piece is solved and exactly one corner is twisted, the cube may have been physically changed. Check the puzzle’s assembly before attempting further algorithms.
How much practice does it take to solve a Rubik’s Cube without instructions?
It depends on how quickly you learn the notation and remember the steps. Practice the white cross and first layer first, then work through the middle and yellow layers. After several successful solves, the sequence of steps becomes easier to remember.
Conclusion
Learning how to make all sides of a Rubik’s Cube match comes down to following the correct order. Begin with the white cross, complete the white corners and middle layer, form the yellow cross, match the yellow edges, position the yellow corners, and orient them to finish.
Use the center colors to identify where each piece belongs, maintain the correct cube orientation, and complete every algorithm before checking the result.
Focus on solving the puzzle accurately rather than quickly. Once you can finish all six faces without assistance, you can start improving your speed with more advanced methods.
