
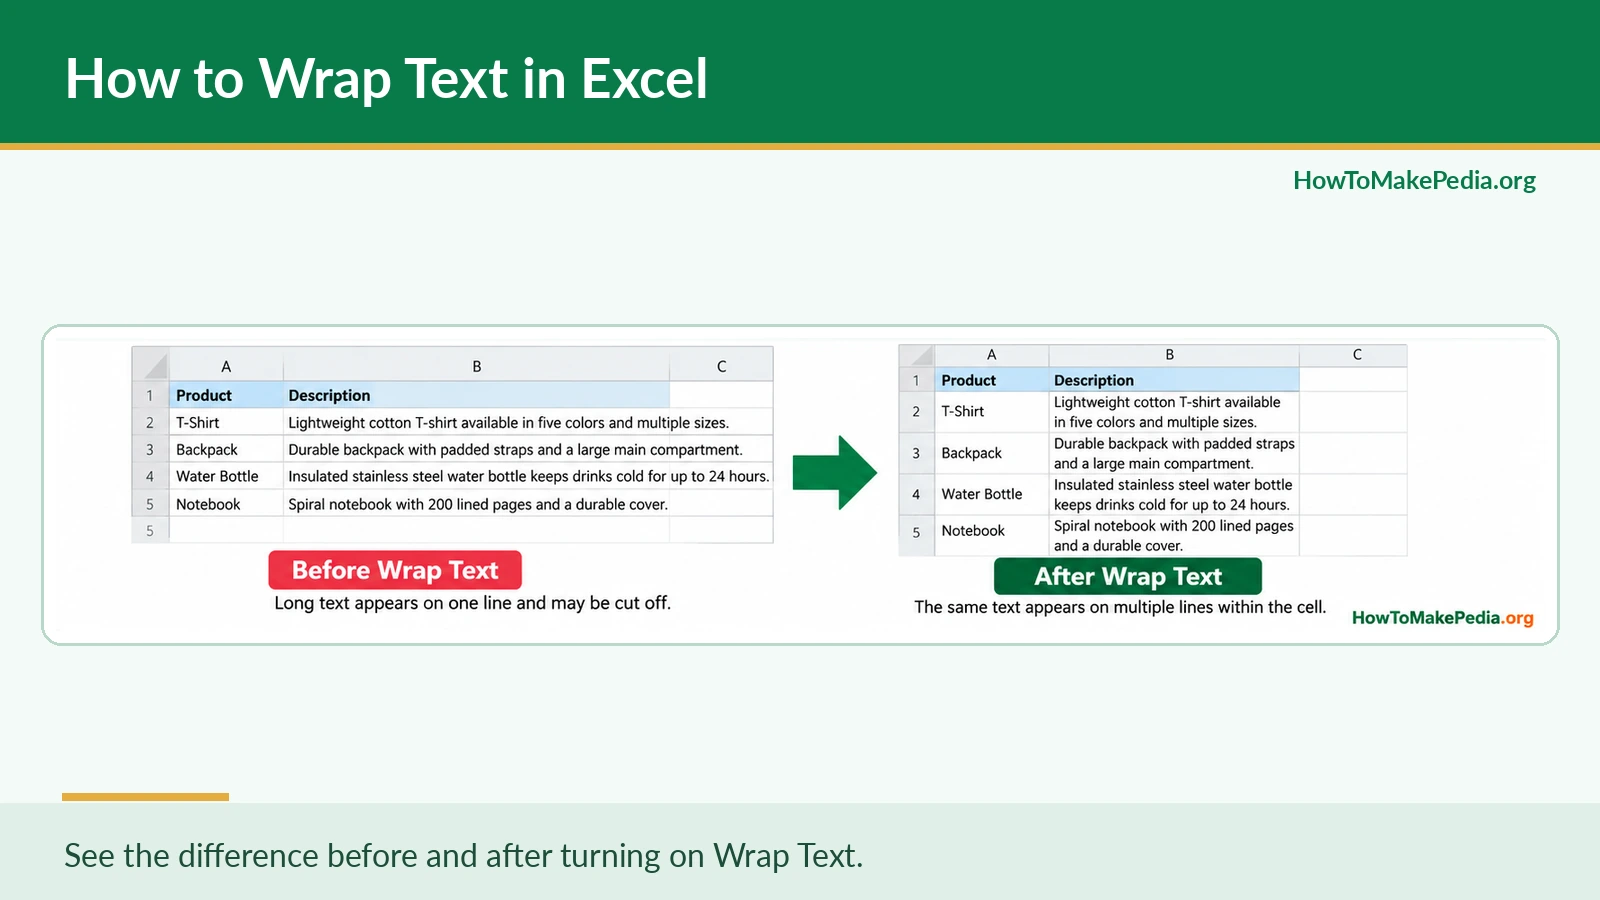

To wrap text in Excel, select the cells you want to format, open the Home tab, and click Wrap Text in the Alignment group. Excel displays long text on multiple lines inside the same cell without changing its content.
You can also use keyboard shortcuts, insert manual line breaks, and adjust row height when text gets cut off. Here’s how each method works on Windows, Mac, and Excel Online.
What Does Wrap Text Mean in Excel?
Wrap Text is an Excel formatting feature that displays long text on multiple lines within a single cell.
For example, suppose cell B2 contains this customer comment:
“The package arrived on time, but the instructions were difficult to understand.”
Without text wrapping, the comment may extend into empty neighboring cells or appear cut off when adjacent cells contain data.
With Wrap Text enabled, Excel displays the comment across several lines inside B2.
| Before Wrap Text | After Wrap Text |
|---|---|
| Long text appears on one line and may be cut off. | The same text appears on multiple lines within the cell. |
| The cell may be difficult to read. | The entire comment is easier to read. |
| The row may remain short. | The row can expand to fit the text. |
Wrapping doesn’t delete words, create additional cells, or change the stored text. It only changes how the information appears.
How to Wrap Text in Excel Using the Home Tab
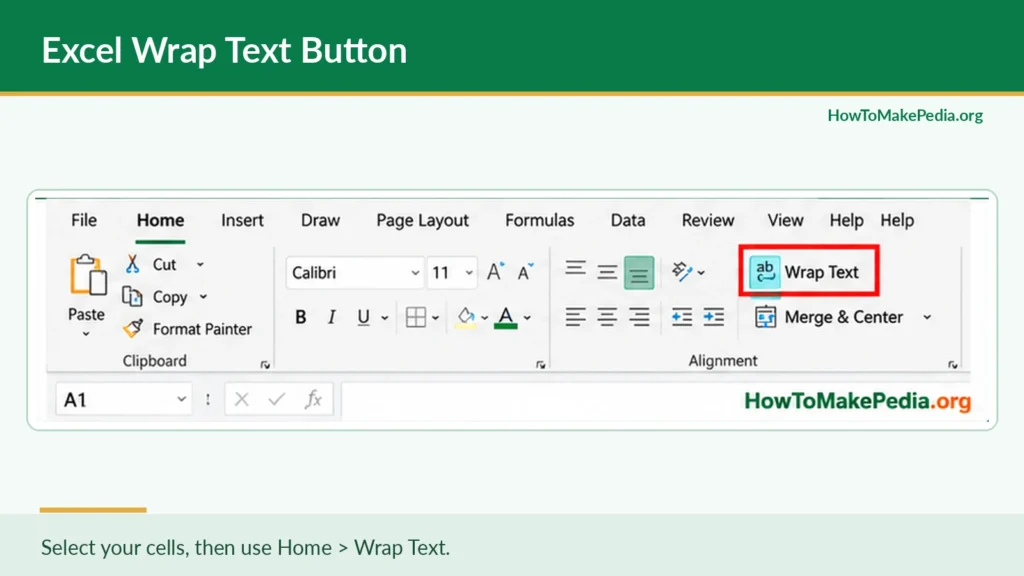
The Home tab provides the easiest way to wrap text in Microsoft Excel.
Step-by-Step Instructions
- Open your Excel workbook.
- Select the cell containing the long text. You can also select several cells.
- Click the Home tab at the top of Excel.
- Find the Alignment group on the Ribbon.
- Click Wrap Text.
- Check that the complete text is visible. Adjust the row height if necessary.
Example: Wrapping a Product Description
Imagine you’re managing a store inventory spreadsheet.
Cell B2 contains:
“Lightweight cotton T-shirt available in five colors and multiple sizes.”
Before wrapping, the description may extend beyond column B.
After you select B2 and enable Wrap Text, Excel displays it over several lines while keeping the complete description in the same cell.
If you make column B wider, Excel may use fewer lines. Making the column narrower generally creates more lines.
Excel’s Home tab offers several useful formatting tools beyond text wrapping. For example, if you need to cross out completed tasks or outdated information without deleting it, learn how to strikethrough in Excel.
How to Wrap Text in Excel Using a Keyboard Shortcut
If you’re working in Excel for Windows, you can use a quick Ribbon keyboard sequence.
Excel Wrap Text shortcut: Alt, H, W
Follow these steps:
- Select the cell or range you want to format.
- Press
Alt. - Press
H. - Press
W.
Press these keys one after another, not simultaneously.
This sequence accesses the Home tab and toggles Wrap Text in supported Windows desktop versions.
Excel Keyboard Shortcut Comparison
| Action | Windows Shortcut | Purpose |
|---|---|---|
| Wrap or unwrap text | Alt, H, W | Toggle automatic wrapping |
| Insert a manual line break | Alt + Enter | Start a new line inside a cell |
| Open Format Cells | Ctrl + 1 | Access cell formatting options |
Remember that Alt + Enter is different from Alt, H, W. The first inserts a line break at a specific location, while the second controls automatic wrapping.
How to Wrap Text in Excel on Mac
Excel for Mac also provides the Wrap Text button on the Home tab.
- Open your workbook in Excel for Mac.
- Select the cell or cells containing long text.
- Click Home.
- Select Wrap Text.
- Adjust row height if the complete text isn’t visible.
To insert a manual line break while editing a cell on Mac, press Control + Option + Return.
Don’t assume Windows Ribbon shortcuts work the same way on macOS.
How to Wrap Text in Excel Online
You can wrap text without installing Excel by using Excel for the web.
Steps for Excel Online
- Open your workbook in Excel for the web.
- Select the cell or range containing long text.
- Open the Home tab.
- Find the Wrap Text option among the alignment controls.
- Select it to enable wrapping.
- Review the row height and adjust it if necessary.
For example, if you have a shared workbook containing employee notes, you can wrap the Notes column to make longer entries easier to read.
The web version’s interface may differ slightly from desktop Excel. Using the Home tab is generally the most reliable approach.
How to Wrap Text in Multiple Cells or an Entire Column
You don’t need to wrap each cell individually.
Suppose column B contains customer feedback from rows 2 through 100.
To wrap all those entries:
- Select the range
B2:B100. - Click Home > Wrap Text.
- Adjust row heights where necessary.
To wrap an entire column, click its letter at the top of the worksheet and select Wrap Text.
You can also select the entire worksheet using the Select All button at the intersection of the row and column headings.
However, wrapping only the columns that contain longer descriptions usually produces a cleaner layout.
How to Insert a Manual Line Break in an Excel Cell
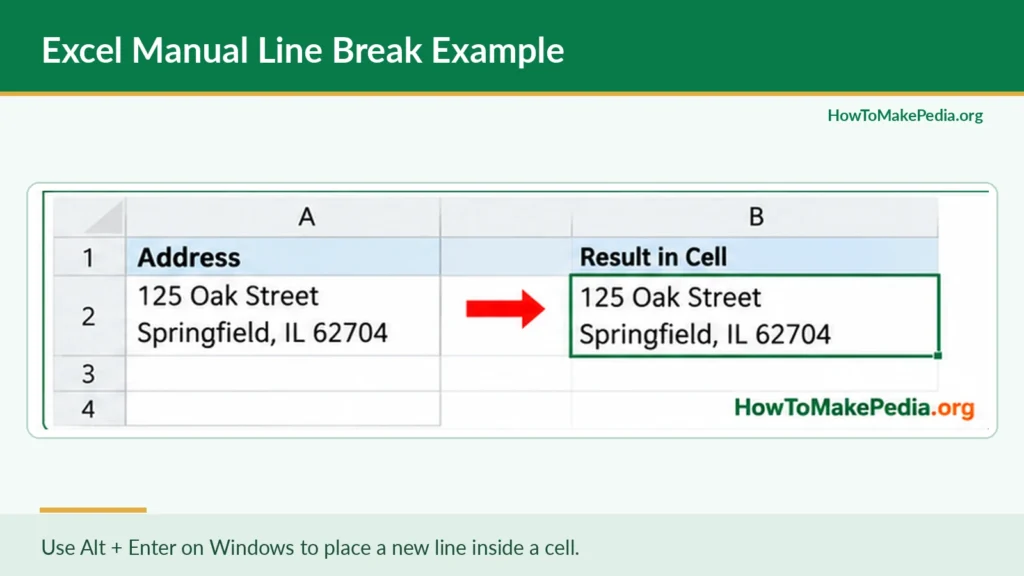
Automatic wrapping lets Excel choose where lines break. A manual line break lets you decide exactly where the next line should begin.
Insert a Line Break on Windows
- Double-click the cell to enter editing mode.
- Move the cursor to the position where you want a new line.
- Press Alt + Enter.
- Finish editing the cell.
Insert a Line Break on Mac
Follow the same process, but press Control + Option + Return.
Example: A Mailing Address
Suppose you want one cell to display:
125 Oak Street
Springfield, IL 62704
Enter the street address, insert a manual line break, and type the city, state, and ZIP code.
This keeps the full address inside one cell while displaying it on two lines.
You may still need to adjust the row height to reveal both lines.
Wrap Text vs. Manual Line Break: What’s the Difference?
| Feature | Automatic Wrap Text | Manual Line Break |
|---|---|---|
| Line positioning | Excel chooses | You choose |
| Responds to column width | Yes | The inserted break stays in place |
| Requires editing cell text | No | Yes |
| Best use | Descriptions and comments | Addresses and structured labels |
| Underlying value | Unchanged | Contains a line-break character |
Use automatic wrapping for ordinary long descriptions. Choose manual line breaks when specific line placement matters.
How to Automatically Adjust Row Height for Wrapped Text
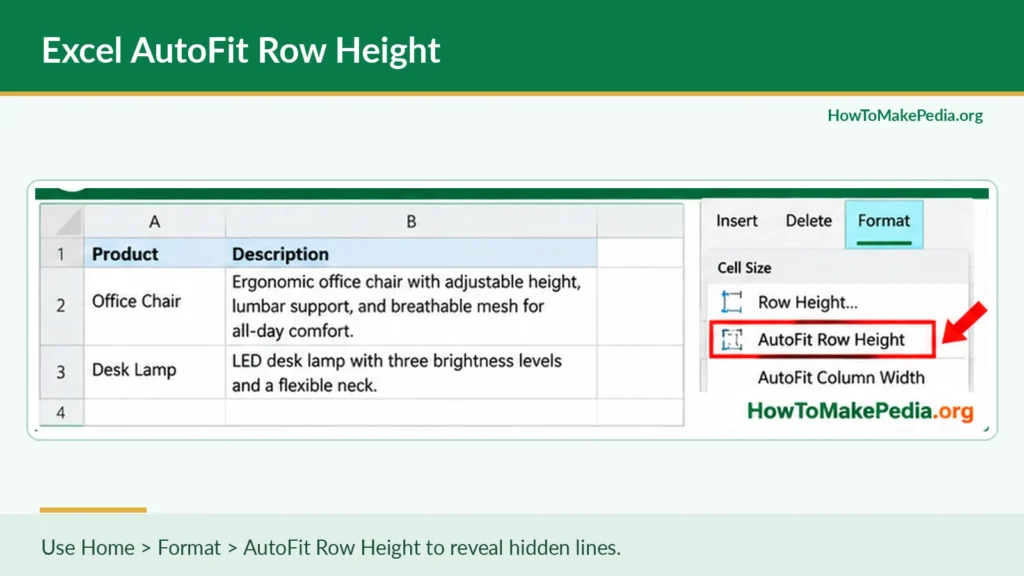
Sometimes Wrap Text is enabled, but the complete text remains hidden.
This often happens because the row has a fixed height.
Use AutoFit Row Height
- Select the affected row or rows.
- Open the Home tab.
- Click Format in the Cells group.
- Select AutoFit Row Height.
- Check that all lines are visible.
You can also double-click the bottom boundary of a row heading to adjust the height to fit its contents.
AutoFit Row Height vs. AutoFit Column Width
- AutoFit Row Height: Adjusts row height to fit the displayed content.
- AutoFit Column Width: Adjusts column width to accommodate its contents.
- Manual adjustment: Lets you drag row or column boundaries to a preferred size.
For long product descriptions, combining Wrap Text with AutoFit Row Height is often more practical than making every column extremely wide.
How to Wrap Text in Merged Cells
Merged cells can cause difficulties with automatic row sizing.
For example, if you’ve merged cells A1 and B1, the row may not automatically expand enough to show all wrapped text.
Try these solutions:
- Increase the row height manually.
- Widen the merged area when appropriate.
- Avoid merging cells that need frequent text updates.
- Consider Center Across Selection for certain headings instead of merging cells.
AutoFit Row Height may not behave as expected with merged cells, so manually adjusting the layout is often necessary.
Why Is Wrap Text Not Working in Excel?
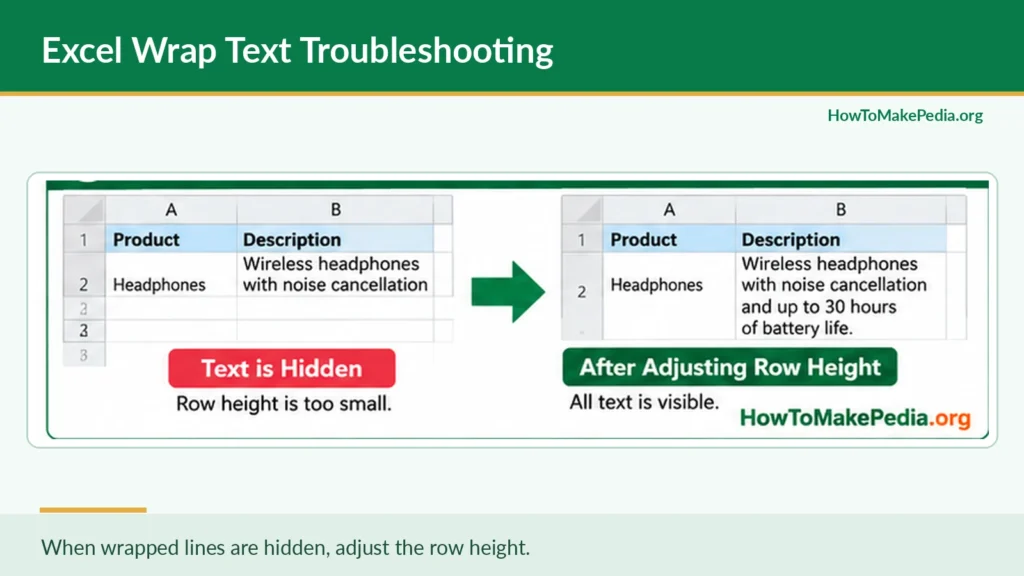
If text wrapping isn’t displaying correctly, check these common issues.
1. Row Height Is Too Small
Problem: Text wraps, but some lines are hidden.
Fix: Select the row and choose Home > Format > AutoFit Row Height.
2. The Cells Are Merged
Problem: Excel doesn’t expand the merged range properly.
Fix: Increase row height manually or reconsider the merged layout.
3. The Column Is Too Narrow
Problem: Text appears cramped or difficult to read.
Fix: Drag the right boundary of the column heading to increase its width.
4. The Text Contains One Long Word
Problem: A long word, product code, or uninterrupted string doesn’t wrap as expected.
Fix: Widen the column, reduce the font size slightly, or insert a deliberate line break where appropriate.
5. The Wrong Cells Are Selected
Problem: Wrap Text works in some cells but not others.
Fix: Select the correct cells and apply the formatting again.
6. Excel Is in Editing Mode
Problem: You can’t change the wrapping format while editing a cell.
Fix: Press Enter to finish editing, select the cell, and apply Wrap Text.
7. Manual Line Breaks Affect the Layout
Problem: The text contains unexpected empty lines or breaks at unwanted positions.
Fix: Edit the cell and remove unnecessary line breaks.
Problem: Pasted or imported text displays unusual spacing.
Fix: Inspect the original text for hidden characters. Excel’s CLEAN function can remove certain nonprinting characters, but it may also remove intentional line breaks.
Keep a copy of the original data before cleaning it.
How to Remove Wrap Text in Excel
You can disable automatic wrapping without deleting your data.
- Select the wrapped cell or range.
- Open the Home tab.
- Click Wrap Text again to turn it off.
- Adjust the row height if necessary.
For example, if a product description spans four lines, disabling Wrap Text returns it to a single-line display when there are no manual line breaks.
Note: Turning off Wrap Text doesn’t remove line-break characters inserted with Alt + Enter.
Avoid using Clear Formats solely to disable wrapping because it can remove other formatting, including colors and borders.
Wrap Text vs. Shrink to Fit in Excel
Excel also offers a feature called Shrink to Fit.
Wrap Text displays long text across multiple lines.
Shrink to Fit reduces the displayed font size so the content fits within the available cell width.
For example, a long product description may become difficult to read if Excel shrinks the font too much.
Wrapping is usually better for customer comments, detailed notes, and descriptions. Shrink to Fit can be useful for short labels that are only slightly too long.
Does Wrap Text Change Cell Values or Formulas?
No. Automatic Wrap Text changes how Excel displays cell contents. It doesn’t ordinarily modify the stored value or change how formulas calculate.
For example, enabling Wrap Text in a cell containing =SUM(A1:A5) doesn’t change the formula’s calculation.
However, manually inserting a line break into a text value adds an actual line-break character.
The two features affect cell content differently.
Best Practices for Wrapping Text in Excel
Use wrapping where it improves readability rather than applying it to every cell.
- Column headers: Wrap longer headings instead of creating unnecessarily wide columns.
- Product descriptions: Use a reasonable column width with automatic row sizing.
- Customer feedback: Keep full comments visible without changing their wording.
- Mailing addresses: Use manual line breaks when a specific structure is needed.
- Reports and task trackers: Apply consistent formatting to notes and descriptions.
Keep an eye on row height. Excessively tall rows can make large spreadsheets harder to navigate.
Common Mistakes When Wrapping Text in Excel
Several small formatting choices can make a worksheet less readable.
- Using Alt + Enter when automatic wrapping would work better.
- Forgetting to adjust row height after enabling Wrap Text.
- Widening every column instead of wrapping long descriptions.
- Merging cells unnecessarily.
- Applying wrapping to the wrong range.
- Using Shrink to Fit until the font becomes too small.
- Assuming Wrap Text changes the stored cell value.
- Using Clear Formats and accidentally removing other styling.
- Assuming Excel shortcuts work identically on Windows, Mac, and the web.
Most problems can be avoided by checking the selected cells, column width, row height, and Excel version before making further changes.
Clear formatting makes spreadsheets easier to read, but keeping your data organized matters just as much. If your worksheet contains repeated entries, follow our guide on how to remove duplicates in Excel to clean up your data.
Frequently Asked Questions
How do I wrap text in Excel?
Select the cells, open Home, and click Wrap Text in the Alignment group.
What is the shortcut for Wrap Text in Excel?
On supported Windows desktop versions, press Alt, then H, then W in sequence.
How do I wrap text in Excel on Mac?
Select the cells and click Home > Wrap Text.
How do I wrap text in Excel Online?
Open the workbook in Excel for the web, select the cells, and choose Wrap Text from the Home tab.
How do I wrap text in multiple cells?
Select the complete range and click Wrap Text once to apply the formatting to all selected cells.
How can I insert a new line within one cell?
On Windows, press Alt + Enter while editing. On Mac, press Control + Option + Return.
Why is Wrap Text not working?
Common causes include fixed row height, merged cells, narrow columns, or selecting the wrong range.
How do I make Excel automatically adjust row height?
Select the affected rows and choose Home > Format > AutoFit Row Height.
Why does Wrap Text not work in merged cells?
Merged cells can interfere with automatic row-height adjustment. You may need to change the row height manually.
How do I remove Wrap Text?
Select the cells and click Home > Wrap Text again to turn it off.
What is the difference between Wrap Text and Shrink to Fit?
Wrap Text displays content on multiple lines. Shrink to Fit reduces the displayed font size to fit the cell width.
Does Wrap Text change Excel formulas?
No. Automatic wrapping changes cell appearance, not the stored formula or its ordinary calculation.
Conclusion
The easiest way to wrap text in Excel is to select the cells and click Home > Wrap Text. On Windows, you can also use the Alt, H, W keyboard sequence.
For precise line breaks, use Alt + Enter on Windows or Control + Option + Return on Mac.
If wrapped text remains hidden, try AutoFit Row Height. With the right column width and row height, you can keep long descriptions, comments, and headings readable without changing the underlying data.

3 Comments
Pingback: How to Insert Bullets in Excel: 6 Easy Methods
Pingback: How to Remove Table Formatting in Excel (4 Easy Ways)
Pingback: How to Add a Check Box in Excel: 2 Easy Methods