


To remove duplicates in Excel, select your data, go to Data > Remove Duplicates, choose the columns you want to compare, and click OK. Excel will keep the first matching record and remove the other duplicates.
Before doing this, save a backup. Removing duplicates changes your selected data, and you may accidentally delete information you need.
If you want to keep your original records, Excel also offers the UNIQUE function, Advanced Filter, Conditional Formatting, and Power Query. Here’s how to use each method safely.
What Are Duplicates in Excel?
Duplicates are repeated values or records in a spreadsheet. They commonly appear when you combine customer lists, import information, or enter the same details more than once.
For example, a customer spreadsheet might contain:
- Duplicate names: Two customers named Mia Chen.
- Duplicate emails: The same email address entered multiple times.
- Duplicate rows: Two records with identical information in every column.
- Repeated customer IDs: One customer appearing in several transactions.
Not every repeated value is a mistake.
A customer might place three different orders using the same email address. Deleting those records based only on email could erase legitimate transactions.
The key is deciding which columns should identify an unwanted duplicate.
Before Removing Duplicates: Protect Your Data
Removing duplicate rows is easy. Recovering deleted records can be harder.
Take these precautions before cleaning your spreadsheet:
- Save a backup. Use File > Save As or Save a Copy to preserve the original workbook.
- Select the complete table. Don’t select only the email column if the related names, dates, and IDs also need to stay together.
- Check your headers. Make sure Excel recognizes the first row as column headings.
- Choose your matching columns. Decide whether email, customer ID, or the entire row defines a duplicate.
- Review the records. Some repeated values represent genuine purchases or activity.
- Decide what to keep. You might need the latest record instead of the earliest one.
Deleting a duplicate row is different from deleting an individual cell. Removing cells separately can shift information and leave customer details matched to the wrong records.
Method 1: Remove Duplicates Using Excel’s Built-In Tool
The built-in Remove Duplicates command is the quickest option when you want to clean an existing table.
Step-by-Step Instructions
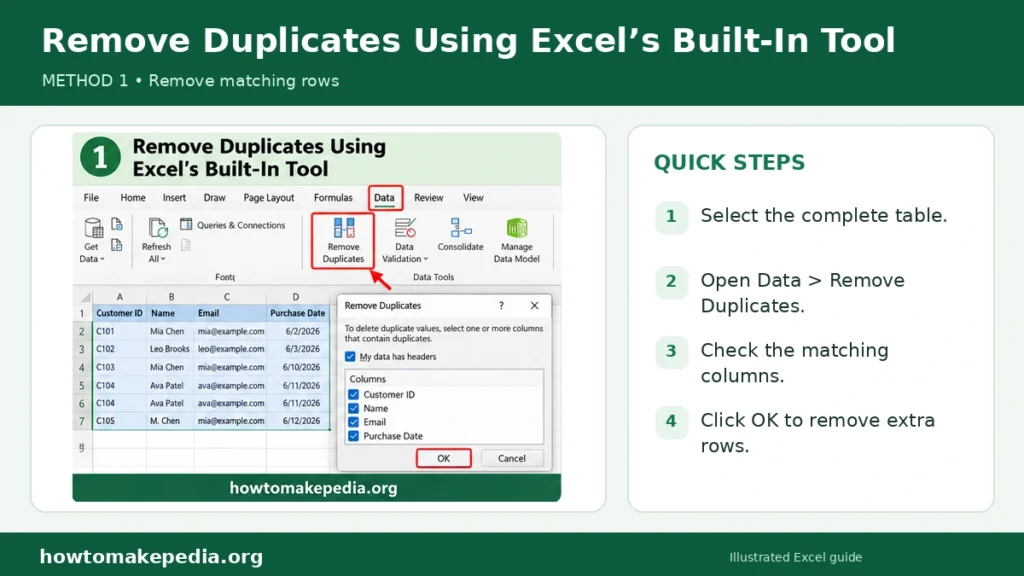
- Open the Excel workbook containing your data.
- Select your entire table, including the headers, or click inside an existing Excel table.
- Open the Data tab.
- Select Remove Duplicates in the Data Tools group.
- Check My data has headers if the first row contains headings.
- Select the columns Excel should compare.
- Click OK.
- Review the message showing how many duplicates were removed and how many unique values remain.
Excel keeps the first occurrence of each matching combination in the current list order.
Example: Removing Duplicate Customer Records
Suppose your spreadsheet contains these six records.
| Customer ID | Name | Purchase Date | |
|---|---|---|---|
| C101 | Mia Chen | mia@example.com | 6/2/2026 |
| C102 | Leo Brooks | leo@example.com | 6/3/2026 |
| C103 | Mia Chen | mia@example.com | 6/10/2026 |
| C104 | Ava Patel | ava@example.com | 6/11/2026 |
| C104 | Ava Patel | ava@example.com | 6/11/2026 |
| C105 | M. Chen | mia@example.com | 6/12/2026 |
If you select all four columns in the Remove Duplicates dialog, Excel finds one completely identical record: the second C104 row.
The result contains five rows:
| Customer ID | Name | Purchase Date | |
|---|---|---|---|
| C101 | Mia Chen | mia@example.com | 6/2/2026 |
| C102 | Leo Brooks | leo@example.com | 6/3/2026 |
| C103 | Mia Chen | mia@example.com | 6/10/2026 |
| C104 | Ava Patel | ava@example.com | 6/11/2026 |
| C105 | M. Chen | mia@example.com | 6/12/2026 |
However, if you select only Email, Excel keeps just three records because only three distinct email addresses exist.
Important: Excel removes the entire duplicate record from the selected table, including values in columns you didn’t choose for comparison.
When Should You Use This Method?
Choose Remove Duplicates when you need a one-time cleanup, know which records are unwanted, and don’t need a separate formula-based result.
You can normally undo the action immediately using Ctrl+Z on Windows or the Undo command. Don’t rely on Undo as your only backup, especially after making additional changes or closing the workbook.
Method 2: Use the UNIQUE Function Without Deleting Original Data
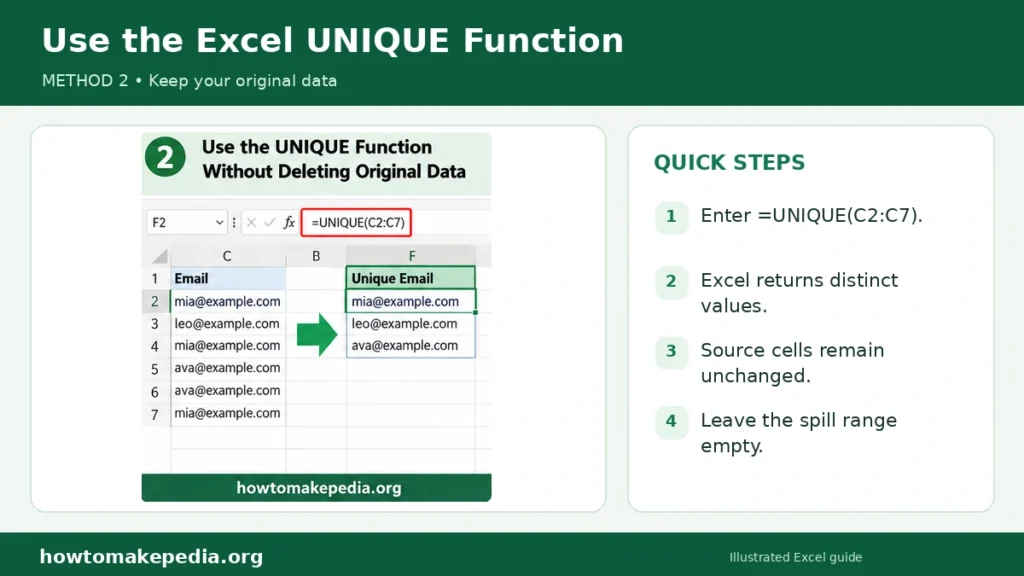
The UNIQUE function is useful when you want a separate list of distinct values while leaving your original spreadsheet unchanged.
It is available in Excel for Microsoft 365, Excel 2024, Excel 2021, and supported Excel web and Mac versions. Older perpetual versions, including Excel 2019, don’t support it.
How to Use the UNIQUE Formula
Suppose your email addresses are in cells C2 through C7.
Click an empty cell, such as F2, and enter:
=UNIQUE(C2:C7)Press Enter.
Excel produces:
| Unique Email |
|---|
| mia@example.com |
| leo@example.com |
| ava@example.com |
The repeated emails disappear from the formula’s output, but the original column remains intact.
Remove Duplicate Rows Across Multiple Columns
To get distinct complete records from columns A through D, enter:
=UNIQUE(A2:D7)Excel compares the complete row values and returns each distinct combination.
In the earlier customer example, the result contains five records because the duplicate C104 row appears only once.
Why Does UNIQUE Show a #SPILL! Error?
UNIQUE is a dynamic array formula. It needs empty cells for its results to spread, or spill, into.
If something occupies the output area, Excel may display #SPILL!.
To fix it:
- Select the cell containing the formula.
- Check the intended output area for existing values or merged cells.
- Clear or move anything blocking the result.
- Place the formula outside an Excel Table if necessary.
UNIQUE doesn’t permanently delete duplicate rows. To create a fixed list, copy its results and use Paste Special > Values in a suitable destination.
Method 3: Remove Duplicates Using Advanced Filter
Advanced Filter can create a separate list of unique records without changing the source data.
It’s particularly useful for a one-time extraction in desktop Excel.
Steps to Extract Unique Records
- Select your dataset, including its headers.
- Open Data > Advanced in the Sort & Filter group.
- Choose Copy to another location.
- Confirm the source range in the List range box.
- Enter an empty destination cell in the Copy to box.
- Check Unique records only.
- Click OK.
Excel copies the unique records to the destination.
For example, if your source contains repeated product codes, you can select that single column and extract one copy of each code.
If you select the entire customer table, Advanced Filter compares the selected record values rather than treating email alone as the matching criterion.
Unlike Remove Duplicates, this option doesn’t delete the original records.
Method 4: Find Duplicates Using Conditional Formatting
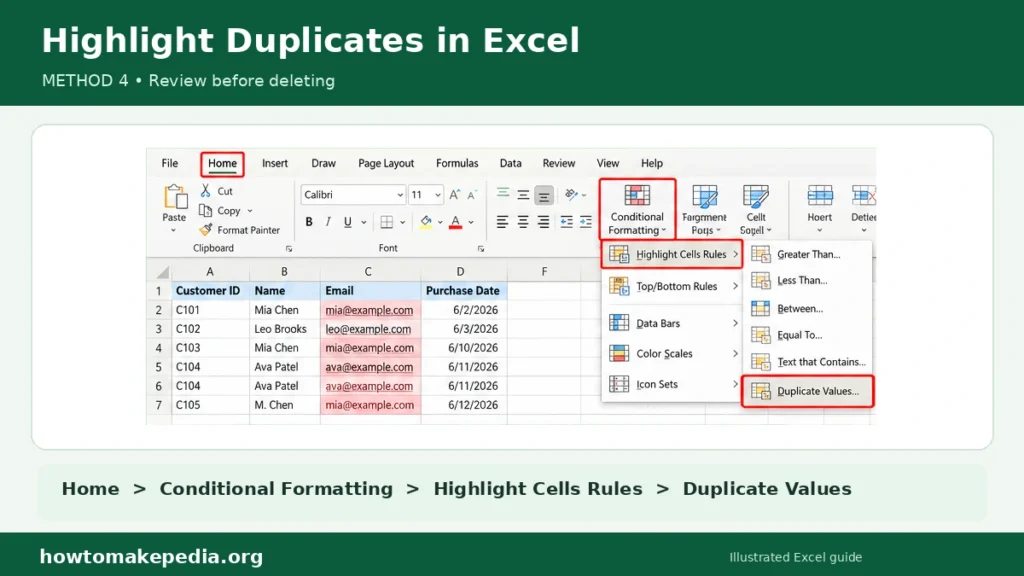
Sometimes you need to see repeated values before deciding whether to delete anything.
Conditional Formatting makes those values easier to spot.
How to Highlight Duplicates
- Select the relevant cells, such as C2.
- Open the Home tab.
- Click Conditional Formatting.
- Choose Highlight Cells Rules > Duplicate Values.
- Select a highlighting style.
- Click OK.
Excel highlights matching values in the selected range.
For example, if an email address appears three times, the matching email cells will be highlighted.
You can then check the purchase dates or customer IDs to decide whether the repeated entries are valid.
Remember: Conditional Formatting only changes the appearance of cells. It doesn’t delete records.
If you decide to remove duplicates manually, delete complete unwanted rows rather than individual cells in one column.
This method is especially useful when repeated information might be legitimate.
Method 5: Remove Duplicates Using Power Query
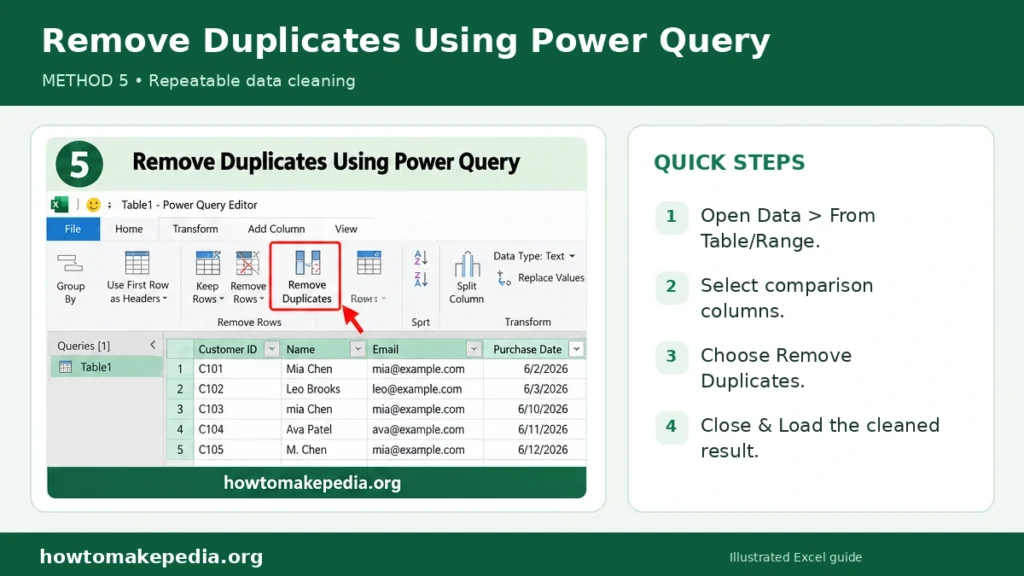
Power Query is a useful option when you regularly import customer data, sales records, or reports containing duplicates.
Instead of repeating a cleanup manually, you can save transformation steps in a query and refresh the results when the source changes.
How to Remove Duplicates With Power Query
In supported desktop versions of Excel:
- Select your dataset or click inside an Excel table.
- Go to Data > From Table/Range.
- Confirm the table range and headers if prompted.
- In Power Query Editor, select the column or columns used to identify duplicates.
- Choose Home > Remove Rows > Remove Duplicates.
- Review the results.
- Choose Close & Load or Close & Load To and load the results into a separate worksheet or destination.
Power Query stores the duplicate-removal step as part of your query.
When new records are added to the connected source, you can refresh the query to apply the same cleanup logic.
One important difference: Power Query doesn’t always guarantee which matching row will be retained. Its processing and optimization can affect the result.
If keeping the latest transaction is essential, use a carefully designed, verified query rather than assuming the first visible row will survive.
Power Query availability and editing features also vary between Excel desktop, Mac, and web plans.
Which Excel Duplicate Removal Method Is Best?
| Method | Changes Original Data? | Difficulty | Best Use |
|---|---|---|---|
| Remove Duplicates | Yes | Easy | Quick one-time cleanup |
| UNIQUE function | No | Easy | Dynamic unique list |
| Advanced Filter | No, when copied elsewhere | Moderate | Extracting distinct records |
| Conditional Formatting | No | Easy | Reviewing repeated values |
| Power Query | Not when output is loaded separately | Moderate | Repeatable data cleaning |
For most beginners, the built-in Remove Duplicates command is the simplest choice. Use UNIQUE when preserving your source data matters more than deleting duplicates.
How to Remove Duplicates Based on One Column
You don’t have to compare every column in a spreadsheet.
Suppose your table contains Customer ID, Name, Email, and Purchase Date.
If your goal is one customer record per email address:
- Select the complete customer table.
- Go to Data > Remove Duplicates.
- Click Unselect All.
- Check only Email.
- Click OK.
Excel keeps the first record for each email address and removes later matching rows from the selected table.
In our six-row example, the result would contain three rows: C101, C102, and C104.
This might work for a contact directory, but it could be wrong for transaction records. Different purchases may legitimately use the same email address.
How to Remove Duplicate Rows Across Multiple Columns
The columns you select determine what Excel considers a duplicate.
Using our customer example:
- Email only: Three records remain.
- Name and Email: Four records remain because “Mia Chen” and “M. Chen” differ.
- All four columns: Five records remain because only the two C104 rows are identical.
To compare multiple columns, select the complete table, open Remove Duplicates, and check the fields that together define a unique record.
For an order spreadsheet, you might compare Customer ID and Order ID instead of Customer ID alone.
Choosing the correct combination prevents you from deleting legitimate transactions.
How to Keep the First Occurrence and Remove the Rest
Excel’s built-in Remove Duplicates command keeps the first matching occurrence in the current list order.
If you want the most recent record instead, arrange the data before removing duplicates.
For example:
- Select the entire dataset.
- Open Data > Sort.
- Choose your date column.
- Sort from Newest to Oldest.
- Verify that entire records moved together.
- Run Remove Duplicates using your chosen identifier.
For each matching identifier, the newest record should now appear first.
Check whether two records share the same date. If so, use an additional reliable sorting criterion when the exact retained record matters.
Remove Duplicates in Excel Using a Formula
You can also use a COUNTIF formula to identify repeated entries.
Suppose email addresses begin in C2.
In E2, enter:
=COUNTIF($C$2:C2,C2)>1Copy the formula down the column.
The formula returns:
- FALSE: This is the first occurrence so far.
- TRUE: The value has appeared earlier in the list.
Filter the helper column for TRUE to review repeated entries.
COUNTIF doesn’t delete records. It simply helps identify them. Blank cells and inconsistent data may need additional checks.
Why Is Excel Not Removing My Duplicates?
If repeated values remain after cleanup, check these common problems.
"Mia Chen" and "Mia Chen " may not behave as matching text when unwanted spaces are present.
Use a helper column:
=TRIM(A2)TRIM removes ordinary leading, trailing, and repeated spaces. Copy the cleaned results as values when appropriate before comparing records.
2. Nonprinting Characters
Imported data sometimes contains invisible characters.
Try:
=TRIM(CLEAN(A2))CLEAN removes certain nonprinting characters, while TRIM handles standard spaces. Neither function solves every invisible-character issue.
For nonbreaking spaces, a SUBSTITUTE-based cleanup may also be needed.
3. Wrong Comparison Columns
If you select every column, Excel will only remove rows whose selected values match.
If your objective is one record per email, choose Email rather than every field.
4. Incorrect Header Setting
Make sure My data has headers is selected when your first row contains column names. Otherwise, Excel may treat the header as a data record.
5. Blank Cells
Multiple empty cells can be treated as matching values when their other selected fields also match.
Review blank identifiers before deleting records. Missing email addresses don’t necessarily identify the same customer.
6. Formula Results and Formatting Differences
Excel may consider cells with different formulas duplicates when their displayed results match. Differences in how numbers or dates are displayed can also affect duplicate comparisons.
Review the underlying values and number formats when unexpected results appear.
7. #SPILL! Errors
For UNIQUE formulas, clear obstructing cells, remove problematic merged cells, or relocate the formula.
8. Unsupported Excel Version
If Excel displays #NAME? for UNIQUE, check your Excel version and function spelling. In older versions, use Remove Duplicates or Advanced Filter instead.
How to Prevent Duplicate Entries in Excel
Excel’s Data Validation feature can help reject repeated entries during normal typing.
Suppose email addresses are entered in C2.
Select that range, go to Data > Data Validation, choose Custom, and enter:
=COUNTIF($C$2:$C$500,C2)=1Configure an appropriate error alert using the Stop style.
The rule checks whether the current email appears once in the specified range.
It works best when applied to a clean list. Data Validation may not reliably prevent duplicates introduced through copying, pasting, or other workflows, so periodic checks are still useful.
Common Mistakes When Removing Duplicates
Avoid these problems when cleaning your spreadsheet:
- Deleting legitimate records that happen to share a name or email.
- Selecting one column without keeping related data together.
- Comparing too many columns or the wrong columns.
- Forgetting to create a backup.
- Assuming UNIQUE permanently deletes duplicate rows.
- Treating headers as ordinary data.
- Assuming highlighted duplicates have already been removed.
- Deleting individual cells and misaligning records.
- Ignoring Excel version differences.
- Trusting formulas without reviewing their output.
The safest approach is to inspect a small sample first, confirm the expected result, and then apply the method to the full dataset.
Frequently Asked Questions
How do I remove duplicates in Excel quickly?
Select your table, open Data > Remove Duplicates, choose the matching columns, and click OK.
How do I remove duplicates without losing original data?
Use the UNIQUE function or Advanced Filter to generate a separate list. Power Query can also load a cleaned result separately.
How do I remove duplicate rows but keep one?
Use Remove Duplicates. Excel keeps the first matching occurrence in the current list order.
How do I remove duplicates based on one column?
Select the entire table, open Remove Duplicates, and check only the column that should identify repeated records.
Can I remove duplicates across multiple columns?
Yes. Select two or more columns in the Remove Duplicates dialog. Excel compares their combined values.
What Excel formula removes duplicates?
=UNIQUE(A2:A20) returns distinct values without changing the original range. COUNTIF can flag repeated entries.
Does UNIQUE delete duplicate rows?
No. It creates a separate dynamic result and leaves source records intact.
How do I highlight duplicates before deleting them?
Use Home > Conditional Formatting > Highlight Cells Rules > Duplicate Values.
Why is Excel not removing duplicate values?
Check for extra spaces, mismatched columns, inconsistent formatting, blank values, and incorrect header settings.
Can I remove duplicates in Excel for the web?
Yes. Excel for the web supports Data > Remove Duplicates. Other advanced data-cleaning features may vary by plan.
How do I keep the latest record?
Sort the complete dataset by date, newest first, verify the order, then use Remove Duplicates on the appropriate identifier.
What is the difference between Remove Duplicates and Power Query?
Remove Duplicates directly changes the selected data. Power Query saves cleanup steps that can be refreshed and loaded separately.
Conclusion
Removing duplicates in Excel doesn’t have to be complicated. The built-in Remove Duplicates tool is usually the fastest solution for a one-time cleanup, while the UNIQUE function works better when you want a separate list without deleting anything. Power Query is useful for recurring cleanup tasks.
Whatever method you choose, check your comparison columns, review repeated records carefully, and save a backup before making changes. A few simple checks can prevent important information from being lost.

4 Comments
Pingback: How to Wrap Text in Excel: Easy Steps & Shortcuts
Pingback: How to Hide Rows in Excel: Easy Methods & Shortcuts
Pingback: How to Sum in Excel: 5 Easy Methods & Formulas
Pingback: How to Make a Histogram in Excel: 3 Easy Methods