


Learning how to make a paper jet plane that flies far starts with choosing the right design. A complicated fighter-jet replica may look impressive, but accurate folds, balanced wings, and a smooth launch matter more for distance. This guide uses a classic long-nosed dart that resembles a sleek jet and can be made from one sheet of printer paper without scissors, glue, or staples. You will learn how to fold the plane, check its symmetry, adjust its wings, correct flight problems, and test it for longer, straighter flights.
What You Need
You need only a few basic materials:
- One sheet of paper: U.S. Letter paper (8.5 × 11 inches) is used for this tutorial.
- Flat surface: A clean desk or table for accurate folding.
- Ruler (optional): Helps check wing measurements.
- Measuring tape (optional): Useful for recording flight distances.
- Notebook (optional): Record your adjustments and test results.
The plane requires no tape, paper clips, scissors, or special folding tools.
Best Paper for a Long-Distance Paper Jet

Ordinary printer paper is a reliable starting point. Choose clean, unwrinkled paper weighing approximately 70–90 grams per square meter (gsm).
Standard 20 lb U.S. copy paper, typically around 75 gsm, works well because it combines reasonable stiffness with easy folding.
Lightweight paper: Easy to fold and suitable for gentle gliding, but it may flex or lose its shape during a strong throw.
Medium-weight printer paper: Offers a practical balance of weight, strength, and fold accuracy.
Heavy cardstock: Often creates thick, bulky folds and may make the plane unnecessarily heavy.
There is no universally perfect paper weight. Start with regular printer paper and experiment only after you can make consistent flights.
Before Folding: Accuracy Matters More Than Speed
Three simple habits can improve your finished paper airplane.
- Align edges precisely. Even a small difference between the left and right sides can affect the flight.
- Make clean creases. Run a fingernail or ruler along each fold to keep the paper in position.
- Match both sides. Every fold on the left should be mirrored on the right.
Keep the paper flat throughout the process. If a fold becomes badly crooked, unfold and correct it before continuing.
How to Make a Paper Jet Plane That Flies Far
This tutorial uses the traditional classic dart design, a well-established paper airplane documented by Fold ‘N Fly. It has a pointed nose, swept-back wings, and a simple folding sequence suitable for beginners.
Use one U.S. Letter sheet in portrait orientation, with the short edge at the top.
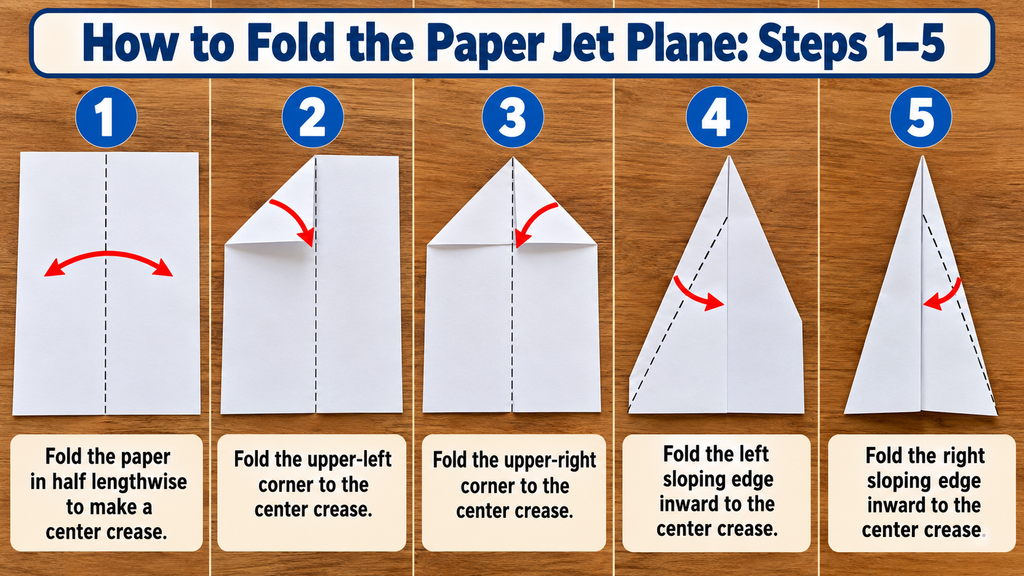
Step 1: Make the center crease
Place the paper vertically on your table. Bring the left long edge over to meet the right long edge, folding the sheet in half lengthwise.
Press firmly along the fold, then open the paper again.
You should now have a straight vertical crease running from the top edge to the bottom edge.
Step 2: Fold the upper-left corner
Take the upper-left corner and fold it diagonally toward the center crease.
Align the original top edge of that corner with the center line, then press the new diagonal crease.
The upper-left section should now form half of a pointed triangular nose.
Step 3: Fold the upper-right corner
Repeat the previous fold with the upper-right corner.
Its original top edge should meet the same center line without overlapping the left fold.
The upper portion of the sheet should now resemble a symmetrical pointed roof, with a triangular point at the top.
Step 4: Narrow the left side of the nose
Find the sloping outer edge on the upper-left side of the triangle you just created.
Bring that sloping edge inward until it aligns with the center crease.
Press the new fold firmly. This creates a longer, narrower left side of the nose.
Step 5: Narrow the right side of the nose
Repeat the previous action on the right.
Bring the matching sloping edge toward the center line and crease it.
Both sides should meet evenly along the central line. Your paper now has a long, sharp-looking nose with several folded layers near its front.
Step 6: Fold the airplane in half
Turn the paper over while keeping the pointed nose at the top.
Fold the model lengthwise along the original center crease, bringing the two halves together so the previously folded flaps end up on the outside.
Press the center fold firmly.
Rotate the folded plane so its nose points left and its tail points right.
Step 7: Form the first wing
With the folded plane lying sideways, take the upper outer layer and fold it downward to form the first wing.
Bring its long upper edge down to align with the straight lower edge of the folded body. Crease along the resulting diagonal fold, running from the pointed nose toward the tail.
You should now see one folded-down wing and a central body underneath it.
Step 8: Form the second wing
Turn the folded airplane over.
Repeat the same wing fold on the opposite side, bringing its outer upper edge down to meet the lower body edge.
Align the wing crease with the first wing’s crease before pressing.
The two folded wings should be matching mirror images.
Step 9: Open the wings
Hold the central folded body gently and lift both wings outward into their flying position.
Keep their broad surfaces approximately level, then raise the tips very slightly so the wings form a shallow V when viewed from the front.
The pointed nose should face straight ahead, with matching swept-back wings on either side.
Step 10: Inspect the finished paper jet
Look at the plane from the front, above, and behind.
Check that both wings have matching shapes and angles, the central body is straight, and the nose is not twisted.
If one wing appears higher or narrower, correct the fold before launching.
Your paper jet is ready for its first test flight.

The Symmetry Check Before Flying
A plane can look correct from above but have an uneven wing angle when viewed from the front.
Place the completed airplane on a flat surface and compare the left and right sides. Check the wing heights, nose alignment, body straightness, and rear wing edges.
Small differences can cause unwanted turning or rolling. Fix structural problems first rather than trying to compensate with large wing bends.
If the folds are seriously uneven, making a fresh airplane will often work better than forcing the old one into shape.
Adjust the Wings for Better Stability

Add a slight dihedral angle. Dihedral means the wings angle upward from the central body when viewed from the front. A subtle V shape can help a paper plane resist rolling from side to side. Keep both wings at approximately the same angle.
Try optional winglets. Small upward folds at the outer wing tips can influence stability, but they also change drag. The basic dart does not require them. If experimenting, make matching folds on both sides and compare the results with an unmodified plane.
Use tiny elevator adjustments. The rear edge of each wing can act as a simple control surface. If the plane consistently dives, bend both trailing edges upward just a little. If it climbs too sharply and stalls, reduce that upward bend.
Start with barely noticeable adjustments. Large upward flaps can make the plane climb, slow down, and lose distance.
How to Throw a Paper Jet Plane for Distance

A good launch combines direction, speed, and a consistent release.
Hold the plane by its central body between your thumb and finger. Keep the wings level and point the nose nearly horizontal or slightly upward.
Start with a firm, smooth forward throw rather than using maximum force immediately.
Watch how the aircraft behaves before increasing speed. Once the flight path becomes stable, try a stronger throw while maintaining the same release technique.
There is no single launch angle that works best for every design. Paper shape, balance, launch speed, release height, and air conditions all influence the result.
Remember that launch angle is the direction in which you throw the plane. Angle of attack describes the relationship between the wing and the oncoming airflow. They are not the same measurement.
First Test Flight: Observe Before Adjusting
A large indoor hall or empty gym is a good location for initial testing because wind will not interfere with the results.
Make a gentle-to-moderate test throw and observe the flight pattern.
- Straight, smooth flight: The plane has a promising starting trim.
- Immediate dive: Check the wings and try a tiny upward trailing-edge adjustment.
- Sharp climb followed by a drop: The plane is likely stalling.
- Turn to either side: Look for uneven folds, twisted wings, or unequal trim.
- Rolling or flipping: Check wing symmetry and the shallow V shape.
Change only one feature between test flights. Otherwise, you may not know which adjustment helped.
Common Paper Jet Flight Problems and How to Fix Them
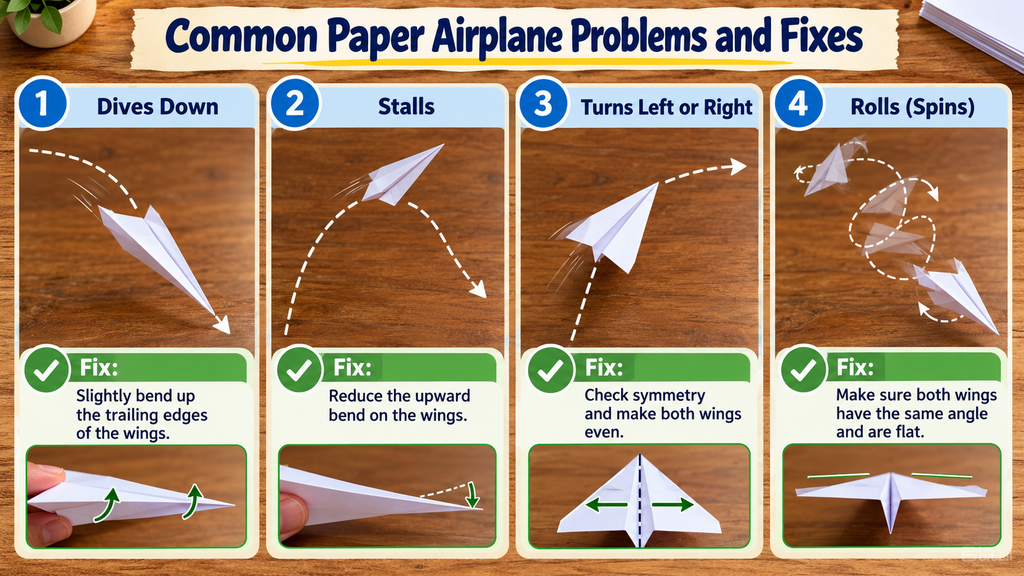
Why does my paper jet dive?
A dive may result from a downward launch, uneven wings, distorted nose, or insufficient nose-up trim. First inspect the plane and check the wing positions. If it still dives, bend the rear edges of both wings upward very slightly and test again.
Why does it climb and then fall?
This is a common stall pattern. The plane climbs steeply, loses airspeed, and drops. Reduce excessive upward elevator bends, lower the launch angle, and try a smoother release.
Why does my paper jet turn left or right?
Check whether one wing is larger, higher, twisted, or bent differently from the other. Restore symmetry before making tiny corrective trim changes. The correct individual wing adjustment depends on the design and how the plane is turning.
Why does it roll over?
Uneven wing angles, warped paper, or a twisted body can cause rolling. Match the two wings and try a small, symmetrical dihedral angle.
Why does it fly fast but not far?
Speed alone does not guarantee distance. A plane may lose energy through excessive drag, insufficient lift, poor balance, or an inefficient launch. Improve its trim and repeat the test before simply throwing harder.
These small trailing-edge corrections are consistent with the Exploratorium’s paper-airplane trimming guidance.
Why Does a Paper Jet Plane Fly?
A paper airplane behaves like an unpowered glider after leaving your hand.
Your throw supplies its initial forward speed. During flight, three important forces influence its movement:
Lift: The aerodynamic force perpendicular to the flight path that helps support the aircraft.
Weight: Gravity pulling the airplane toward Earth.
Drag: Air resistance opposing the airplane’s movement.
According to the NASA Glenn Research Center, gliders have no engine-generated thrust. After launch, a paper airplane uses its initial energy and loses altitude as it travels through the air.
The relationship between lift and drag helps explain why wing shape matters. A plane with excessive drag loses speed quickly, while a better-balanced design may preserve useful forward motion longer.
The center of gravity also matters. It is the approximate balance point of the airplane’s mass. Multiple paper layers near the dart’s nose influence that balance, but excessive forward weight can contribute to diving. Avoid adding metal objects; adjust the paper construction and trim first.
Does a Fighter-Jet Shape Fly Farther?
Not necessarily.
A detailed paper F-22 may have an impressive appearance, but its complicated folds do not automatically improve flying distance.
Real fighter aircraft rely on engines, carefully engineered aerodynamic surfaces, and sophisticated control systems. A paper replica cannot reproduce all those features.
Extra decorative folds may also create bulk, uneven surfaces, or drag.
A classic dart offers a simpler approach: a relatively narrow nose, symmetrical wings, and a shape that is easy to adjust.
Different paper-airplane designs also suit different goals. Distance-focused darts favor efficient forward travel, airtime designs emphasize gentle gliding, and aerobatic models prioritize loops or turns. No single plane is automatically best at everything.
How to Make Your Paper Jet Fly Farther
Once your plane flies reasonably straight, work on improving one detail at a time.
- Improve symmetry and straighten uneven folds.
- Strengthen loose creases without crushing the paper.
- Correct warped or drooping wings.
- Maintain a small, even dihedral angle.
- Use tiny trailing-edge adjustments when needed.
- Practice repeatable launches from the same position.
- Test in calm air before flying outdoors.
- Compare several freshly folded planes using the same paper.
Avoid excessive tape, heavy decorations, or metal weights.
A slightly improved fold or trim adjustment may produce a greater improvement than throwing with additional force.
Test Your Paper Airplane Like an Engineer
Instead of judging performance from one unusually good throw, collect repeatable results.
Mark a starting line on the floor and make five flights using the same plane. Measure the horizontal distance from the starting line to the airplane’s first landing point.
Record the distance and whether the plane dived, stalled, turned, or flew straight.
Add the five distances and divide by five to calculate the average distance.
Then change one variable, such as wing angle or elevator trim, and conduct another five flights under similar conditions.
This method follows the basic approach used in Science Buddies’ paper-airplane experiments.
A4 vs. Letter Paper and Other Materials
This tutorial uses U.S. Letter paper, measuring 8.5 × 11 inches (approximately 216 × 279 mm).
A4 paper measures 210 × 297 mm. It is proportionally longer and narrower, so the same folding sequence produces slightly different wing and body proportions.
Both sizes can be used for the classic dart, although their flight behavior may differ.
Notebook paper can also work, but it is often thinner and may flex more easily. For consistent testing, printer paper is generally a better starting point.
A little tape can sometimes hold loose layers together, but it changes weight and balance and is unnecessary for the main design.
What Is the Paper Airplane Distance World Record?
According to the current Guinness World Records listing, the farthest recorded flight by a paper aircraft is 98.43 meters (322 feet 11 inches).
The record was achieved by Liu Liwen in Shanghai, China, on December 28, 2025, with the support of Tang Shuai, Yang Shian, Huang Yizhou, Qiao Yuchen, and Wang Chenghao.
Such achievements involve specialized design, engineering knowledge, practice, and controlled measurement. A beginner’s classic dart should not be expected to reach record distances.
Paper Airplane Safety
Launch your paper jet in a clear area away from people, animals, windows, and fragile objects.
Never aim a pointed paper nose toward someone’s face or eyes. Avoid roads, moving vehicles, and power lines when flying outdoors.
Use an open, calm area, and supervise younger children. Do not attach sharp or heavy objects to the airplane.
Conclusion
Learning how to make a paper jet plane that flies far is mainly about precision, balance, and testing. A single sheet of ordinary printer paper can become a sleek distance-style dart when the nose is straight, the wings match, and the folds are clean.
Begin with a controlled test flight, correct any diving or stalling, and make tiny adjustments before increasing launch speed. Practice with the same design until your throws become consistent. Small improvements to the wings or trim can matter more than throwing harder.
FAQs:
1. How do you make a paper jet plane that flies far?
Fold a rectangular sheet lengthwise and open it. Bring the upper corners to the center, fold the new sloping edges inward again, and fold the model in half. Make two matching wings, open them with a slight upward V, and test the airplane with a smooth forward throw. Adjust the trailing edges if needed.
2. What paper airplane design flies the farthest?
There is no universally best design for every thrower and condition. Specialized record aircraft can outperform ordinary darts, but classic dart designs are practical for beginners who want fast, reasonably straight flights and easy adjustments.
3. What is the best paper for a long-distance paper airplane?
Regular printer paper around 70–90 gsm is a sensible starting choice. It generally offers enough stiffness to hold sharp folds without becoming excessively heavy. Consistency matters, so use the same paper type when comparing adjustments.
4. Is A4 or Letter paper better for paper airplanes?
Both can work well. Letter paper is slightly wider relative to its length, while A4 is proportionally longer. This changes the folded airplane’s dimensions and balance. Try both with the same folding sequence and compare their actual flight results.
5. Why does my paper airplane keep diving?
Check the launch direction, nose alignment, wing symmetry, and trailing edges. A very small upward bend at the rear of both wings may help correct a persistent dive. Avoid making several major changes at the same time.
6. Why does my paper airplane go up and then crash?
A sharp climb followed by a drop often indicates a stall. The plane loses too much speed while climbing. Try a more level launch and reduce excessive upward bends at the back of the wings.
7. Do winglets make a paper airplane fly farther?
Not automatically. Small winglets can influence stability, but their size and position may also increase drag. For a classic dart, begin without them. Add matching winglets only as an experiment and compare repeated flights.
8. What angle should you throw a paper airplane?
Start nearly level or slightly upward, then adjust based on the flight. The best release angle varies with the airplane’s design, speed, trim, and available space. A stable flight path matters more than following one fixed number.
9. Does throwing a paper airplane harder make it fly farther?
A faster release can improve the distance of a properly trimmed dart, but excessive force may distort the wings or cause unstable flight. First achieve consistent, straight flights with moderate throws, then gradually increase speed.
