
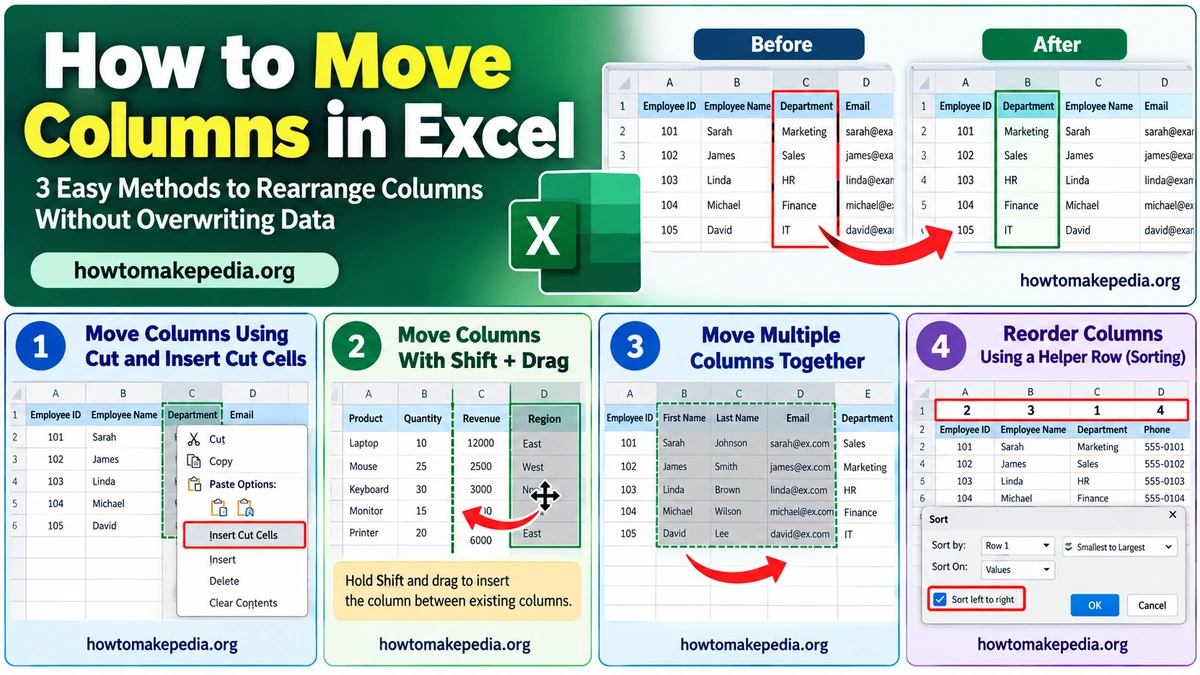

Need to rearrange columns in Excel without losing your data? Select the column you want to move, press Ctrl + X, right-click the column where you want it to appear, and choose Insert Cut Cells. Excel moves the selected column into its new position.
You can also hold Shift while dragging a column to insert it between existing columns. Both methods help you avoid accidentally replacing important information.
Quick Answer: How to Move a Column in Excel
Follow these five steps in Excel for Windows:
- Open your Excel worksheet.
- Click the letter at the top of the column you want to move.
- Press Ctrl + X to cut the entire column.
- Right-click the destination column header.
- Select Insert Cut Cells.
Excel inserts the selected column immediately to the left of the destination column and adjusts the surrounding column positions.
If the result isn’t what you expected, press Ctrl + Z to undo the change, when available.
What Happens When You Move a Column in Excel?
Moving a column changes where its data appears in your worksheet. The information inside that column moves together, including its header, values, and formatting.
For example, imagine you have an employee spreadsheet arranged like this:
Before moving the column:
| A | B | C |
|---|---|---|
| Employee ID | Employee Name | Department |
| 101 | Sarah | Marketing |
| 102 | James | Sales |
You want the Department column to appear before Employee Name.
After moving the column:
| A | B | C |
|---|---|---|
| Employee ID | Department | Employee Name |
| 101 | Marketing | Sarah |
| 102 | Sales | James |
The department information now appears in column B, while employee names move to column C.
Excel’s worksheet letters represent positions. Your field names, such as Department and Employee Name, are the actual headers stored in the cells.
Method 1: Move Columns Using Cut and Insert Cut Cells
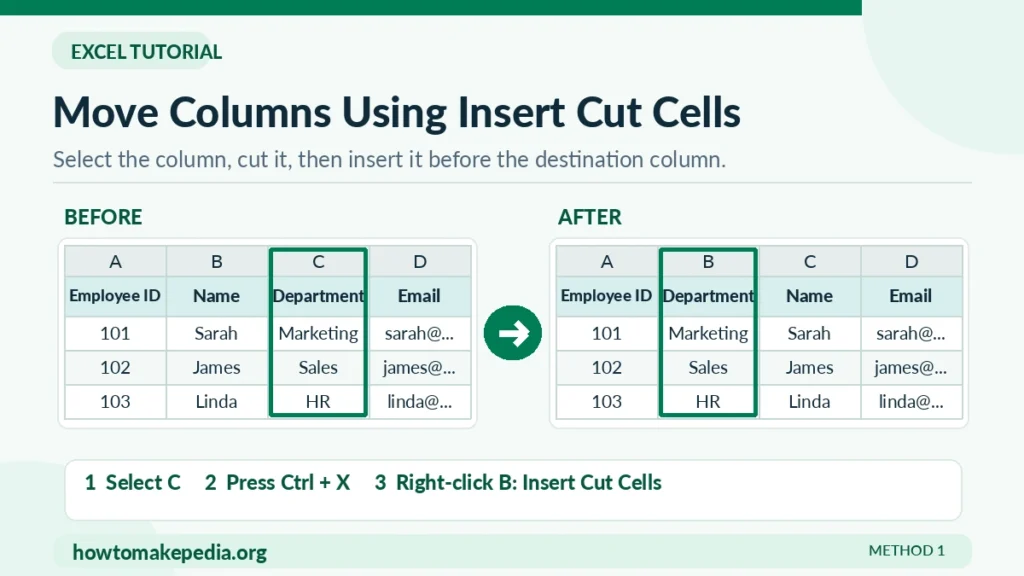
The Cut and Insert Cut Cells method is a reliable way to rearrange columns without manually creating empty space.
Step 1: Select the Column
Open your workbook and locate the column you want to move.
Click its letter at the top of the worksheet. For example, click C to select column C.
Step 2: Cut the Column
Press Ctrl + X on Windows.
Alternatively, right-click the selected column and choose Cut.
Excel displays a moving border around the selected column.
Step 3: Choose the Destination
Find the column before which you want the selected column to appear.
For example, to move column C before column B, right-click the B column header.
Step 4: Select Insert Cut Cells
Choose Insert Cut Cells from the context menu.
Excel inserts the cut column at the selected position and shifts the existing columns as needed.
Step 5: Review the Result
Check the column headers and several rows of data to confirm everything is in the correct place.
This method is generally preferable to cutting a column and using ordinary Paste over cells that already contain information.
Tip: Before reorganizing an important business worksheet, save a backup copy of your workbook.
Method 2: Move Columns With Shift + Drag
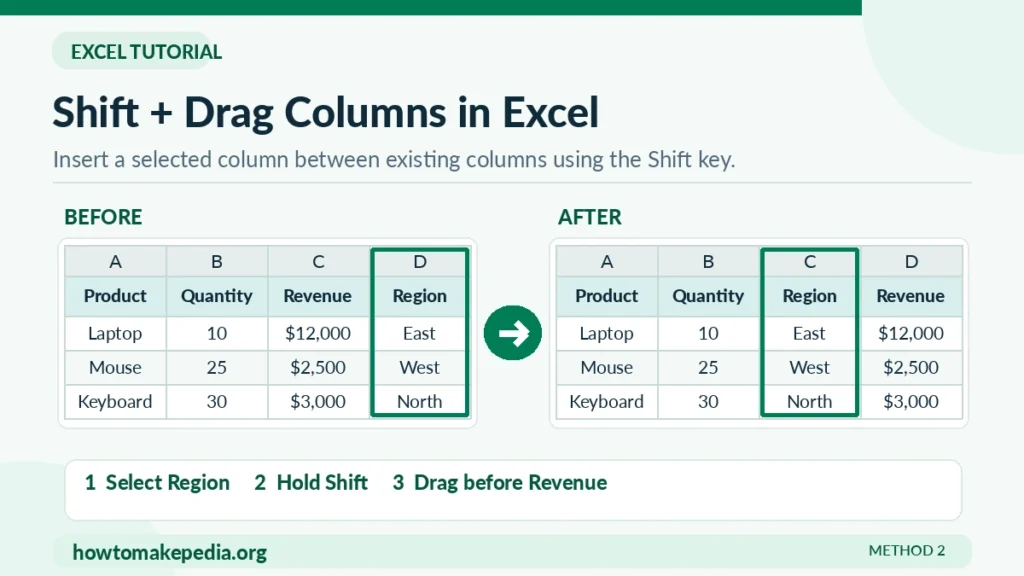
Shift + Drag is useful when you want to move a column using your mouse.
Unlike ordinary dragging, holding Shift lets you insert the column between existing columns in supported Excel desktop versions.
Follow These Steps
- Select the column by clicking its letter.
- Move your mouse to the border of the selected column.
- Wait until the pointer changes to the move pointer.
- Hold down the Shift key.
- Drag the selected column toward its new position.
- Watch the insertion indicator to identify where the column will go.
- Release the mouse button before releasing Shift.
- Check the new column order.
Example
Suppose your sales worksheet contains:
Product | Quantity | Revenue | Region
You want Region to appear before Revenue.
Select the Region column, hold Shift, and drag it to the insertion point immediately before Revenue.
Your new arrangement becomes:
Product | Quantity | Region | Revenue
Important: Dragging without holding Shift may replace existing destination data. If Excel displays an overwrite warning, cancel the operation rather than continuing.
Method 3: Move Multiple Columns Together

You don’t have to move every column individually. Excel can move several adjacent columns as a single selection.
For example, suppose your worksheet contains:
Employee ID | First Name | Last Name | Email Address | Department
You want First Name, Last Name, and Email Address to appear together after Department.
How to Move Adjacent Columns
- Click the header of the first column you want to move.
- Hold Shift and click the last adjacent column header to select the whole group.
- Press Ctrl + X.
- Right-click the column before which you want to insert the group, or use the appropriate destination.
- Choose Insert Cut Cells.
- Check that all three columns appear together in their original order.
You can also use Shift + Drag to move the selected group in supported desktop versions.
Can You Move Nonadjacent Columns Together?
Not with the standard drag-and-drop method.
For example, if you select columns B and D while leaving column C unselected, Excel cannot drag them together as one disconnected group.
Instead, move the columns separately or first organize them into an adjacent group.
How to Move a Column Without Overwriting Data
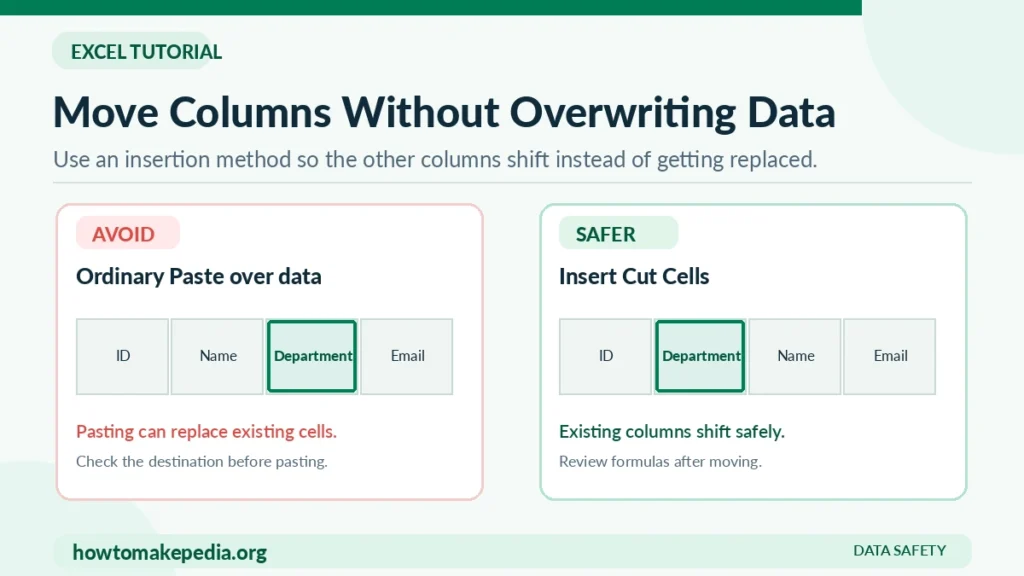
When working with customer records, financial information, or business reports, preserving existing data is more important than moving a column quickly.
Here’s how the main methods compare:
| Method | Effect | Overwrite Risk |
|---|---|---|
| Ordinary Drag | Moves data to another position | May replace destination data |
| Shift + Drag | Inserts the selected column into a new position | Lower when performed correctly |
| Cut + Insert Cut Cells | Moves and inserts columns | Lower when performed correctly |
| Ordinary Cut + Paste | Pastes into the selected destination | May replace existing content |
For most beginners, Cut and Insert Cut Cells is the recommended method.
After moving a column, inspect the headings, formulas, formatting, and any hidden information.
If some worksheet information seems to have disappeared, first check whether rows are hidden. Our guide on how to hide rows in Excel also explains how row visibility works.
How to Move Columns Using Keyboard Shortcuts
Excel provides shortcuts for selecting, cutting, and pasting columns.
| Action | Windows Shortcut |
|---|---|
| Select entire column | Ctrl + Space |
| Cut selected column | Ctrl + X |
| Copy selected column | Ctrl + C |
| Open context menu | Shift + F10 |
| Paste | Ctrl + V |
| Undo recent action | Ctrl + Z |
To move a column, use Ctrl + X, select the destination column, and choose Insert Cut Cells from the context menu.
There is no need to memorize an unreliable shortcut for the insertion command.
Note: Ctrl + Shift + V is not a universal Insert Cut Cells shortcut. Its behavior differs across Excel versions and environments.
How to Move Columns in Excel on Mac
Excel for Mac also supports moving columns using Cut commands and mouse dragging.
Method 1: Cut and Insert
- Click the column letter you want to move.
- Press Command + X to cut the selected column.
- Select the destination column.
- Open its context menu.
- Choose Insert Cut Cells when available.
- Check the result.
Method 2: Shift + Drag
Select the column, position your pointer along the selection border, hold Shift, and drag it to the new insertion position.
Release the mouse button before releasing Shift.
Mac users can press Command + Z to undo an unintended change.
How to Move Columns in Excel for the Web
Excel for the web supports common editing actions, including selecting, cutting, copying, and inserting columns. However, available context-menu commands and drag interactions may differ from desktop Excel.
To rearrange a column:
- Open your workbook in Excel for the web.
- Select the column you want to move.
- Press Ctrl + X.
- Right-click the intended destination column.
- If Insert Cut Cells is available, select it.
- Confirm the new column arrangement.
If Insert Cut Cells is unavailable, use Open in Desktop App for the more predictable insertion workflow.
Another option is to insert a blank destination column before pasting. However, this can leave an empty source column that needs cleanup, so check formulas and references before deleting anything.
Avoid pasting directly over occupied columns.
How to Move Columns to Another Worksheet
Moving columns to another worksheet differs from changing their order within the same sheet.
- Open the worksheet containing your data.
- Select the column or range you want to transfer.
- Press Ctrl + X.
- Switch to the destination worksheet.
- Select an empty destination area.
- Paste the data.
- Review the transferred values, formatting, and formulas.
Use an empty destination to avoid replacing information.
If the original worksheet contains formulas that depend on the moved data, check those references carefully after the transfer.
How to Copy a Column Instead of Moving It
Sometimes you need the same information in two locations.
In that situation, copying is more appropriate than moving.
- Cut: Removes data from its original location when the move is completed.
- Copy: Keeps the original data and creates another copy.
- Insert Cut Cells: Inserts moved data between existing columns.
- Insert Copied Cells: Inserts copied data while preserving the original.
For example, if you want to duplicate an Email Address column:
- Select the Email Address column.
- Press Ctrl + C.
- Right-click the destination column.
- Choose Insert Copied Cells.
- Review the copied information.
Remember that formulas in copied cells can behave differently from formulas in moved cells.
How to Rearrange Several Columns in a Specific Order
If your worksheet contains many columns, Excel’s left-to-right sorting feature offers another option.
This is an advanced technique and is best suited to a carefully selected, ordinary data range.
Example Using a Helper Row
Suppose your columns are:
Employee ID | Employee Name | Department | Phone
You want:
Department | Employee ID | Employee Name | Phone
Follow these steps:
- Save a backup of the workbook.
- Insert a temporary blank row above the dataset.
- Enter the numbers 2, 3, 1, 4 above the four existing columns.
- Select the entire intended range, including the helper row.
- Go to Data > Sort.
- Choose Options.
- Select Sort left to right, then click OK.
- Choose the helper row in Sort by.
- Select Smallest to Largest.
- Apply the sort and verify the final column order.
- Remove the temporary helper row.
The column marked 1 moves first, followed by 2, 3, and 4.
Important: Standard Excel Tables do not support left-to-right sorting in the same way as ordinary cell ranges. Avoid this method when it might interfere with formulas, table structures, or other worksheet content.
Moving Columns vs. Sorting Columns
Manually moving a column changes the position of a selected field.
Left-to-right sorting rearranges an entire selected range based on values in a chosen row.
These are different from sorting records vertically, which changes the order of rows.
If you’re reorganizing a spreadsheet, you may also want to clean repeated records. Our tutorial on how to remove duplicates in Excel explains how to identify and remove duplicate entries.
Does Moving Columns Affect Excel Formulas?
Yes, moving columns can affect formulas and references, although Excel automatically adjusts many references during supported move operations.
Suppose column C contains:
=A2*B2
The formula calculates the product of values in columns A and B.
If you move the columns used by that formula, Excel may update its references to follow the moved cells.
However, results can become unexpected when workbooks contain complex formulas, text-based references such as INDIRECT, external references, named ranges, or other dependencies.
After rearranging columns:
- Check important calculation results.
- Review formulas in affected cells.
- Look for errors such as
#REF!. - Examine charts, tables, and dependent worksheets.
- Compare important totals with the original workbook.
You should also check the presentation of your worksheet after moving fields. Long column headings may need additional formatting. Learn how to wrap text in Excel to display longer headers on multiple lines without widening columns excessively.
Why Can’t I Move Columns in Excel?
If Excel isn’t allowing you to move a column, one of the following issues may be responsible.
1. Drag-and-Drop Is Disabled
In Excel for Windows, go to:
File > Options > Advanced > Editing options
Make sure Enable fill handle and cell drag-and-drop is checked.
2. You’re Dragging the Wrong Area
Move the mouse to the border of the selected column, not the divider between column letters.
Dragging that divider can resize the column instead.
3. You Forgot to Hold Shift
Without Shift, Excel may attempt to move the selected data over an existing range rather than insert it.
Cancel any unwanted overwrite operation and try again.
4. The Worksheet Is Protected
Protected worksheets can restrict editing operations.
If you have permission, check Review > Unprotect Sheet before trying again.
5. Merged Cells Are Interfering
Merged cells may prevent certain movement operations.
Review merged ranges and adjust them carefully if necessary.
6. You’re Working Inside an Excel Table
Excel Tables have their own behavior for manipulating fields.
Try table-specific column rearrangement options or work on a backup copy before changing the worksheet structure.
7. Formulas Changed Unexpectedly
Review the affected formulas and compare them with the original workbook.
Use Undo when possible if the result is incorrect.
8. You Selected Nonadjacent Columns
The ordinary mouse method cannot move separate, disconnected columns as a single group.
Move them individually instead.
9. You’re Using Excel Online
Some desktop interactions may work differently in the web version.
If a command is missing, open the workbook in desktop Excel.
Common Mistakes When Moving Columns
Avoid these mistakes when reorganizing your worksheet:
- Dragging without Shift and accidentally replacing existing data.
- Using ordinary Paste instead of Insert Cut Cells.
- Forgetting to save a backup before making major changes.
- Selecting the wrong destination column.
- Copying when you intended to move data.
- Assuming every Excel version supports the same keyboard shortcuts.
- Trying to drag nonadjacent columns together.
- Ignoring formulas after rearranging the worksheet.
- Sorting records vertically when the goal is to change column order.
Checking the final worksheet usually takes only a moment and can prevent problems from going unnoticed.
Frequently Asked Questions
How do I move a column in Excel?
Select its column letter, press Ctrl + X, right-click the destination column, and choose Insert Cut Cells.
What is the easiest way to rearrange columns?
Cut and Insert Cut Cells is a beginner-friendly option because it inserts the selected column into its new position.
How do I move a column without overwriting data?
Use Insert Cut Cells or Shift + Drag instead of ordinary Paste or dragging without Shift.
Can I drag and drop columns in Excel?
Yes. In supported desktop versions, hold Shift while dragging the selected column’s border to insert it between existing columns.
How do I move multiple columns?
Select neighboring columns together, cut them, and use Insert Cut Cells at the destination.
What is the shortcut for moving columns?
Ctrl + X cuts a column on Windows. You must then select the destination and use an appropriate insertion command.
How do I move columns in Excel on Mac?
Use Command + X and Insert Cut Cells, or hold Shift while dragging the column to its new location.
Can I move columns in Excel Online?
Yes, although the available insertion and drag controls may vary. Check the context menu or use desktop Excel if necessary.
How do I move columns to another sheet?
Cut or copy the selected data, switch to the other worksheet, and paste it into an empty destination area.
What’s the difference between moving and copying columns?
Moving changes the data’s location. Copying duplicates the data while preserving the original.
Why can’t I drag columns?
The drag-and-drop feature may be disabled, the sheet may be protected, or you may be dragging the wrong part of the selection.
Does moving columns affect formulas?
It can. Excel adjusts many references automatically, but you should always review formulas after rearranging columns.
Can I move nonadjacent columns together?
Not with standard mouse drag-and-drop. Move them separately or reorganize them into an adjacent selection.
How do I rearrange columns in a specific order?
Use Cut and Insert Cut Cells for a few columns. For a larger ordinary range, consider left-to-right sorting with a numbered helper row.
Conclusion
Moving columns in Excel is straightforward once you choose the right method. Cut and Insert Cut Cells is a reliable option for beginners, while Shift + Drag provides a quick alternative for desktop users.
When rearranging multiple columns or working with formulas, save a backup first. Always confirm that the final column order, formatting, and calculations are correct before continuing your work.

1 Comment
Pingback: How to Increase Row Height in Excel: 4 Easy Methods