
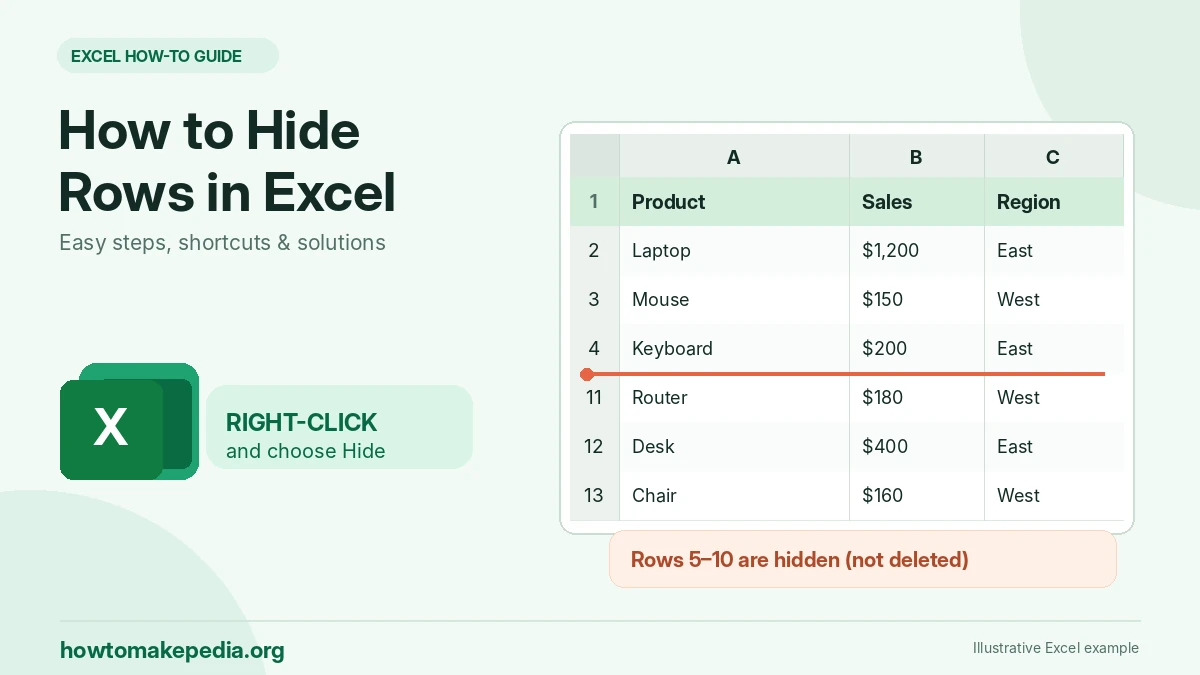

To hide rows in Excel, select the row numbers, right-click the selection, and choose Hide. On Windows, you can also select the rows and press Ctrl + 9.
Hidden rows aren’t deleted. Their values and formulas stay in the worksheet, and you can restore them whenever needed. This guide covers the quickest ways to hide and unhide rows, manage multiple rows, and fix common visibility problems.
What Happens When You Hide Rows in Excel?
Hiding a row removes it from your worksheet’s visible display without deleting its contents.
For example, imagine you’re preparing a monthly sales report. Rows 5 through 10 contain supporting calculations that your manager doesn’t need to see.
Instead of deleting those calculations, you can hide the rows and keep the report focused on the final numbers.
You’ll notice that the row numbers jump from 4 to 11. That gap indicates that some rows aren’t visible.
Hidden rows still contain their original data. Excel formulas may continue using those values, even when you can’t see them.
Remember: Hiding, filtering, and deleting rows are different actions. Hiding changes visibility, filtering controls which records appear, and deleting removes data.
Method 1: How to Hide Rows in Excel Using Right-Click
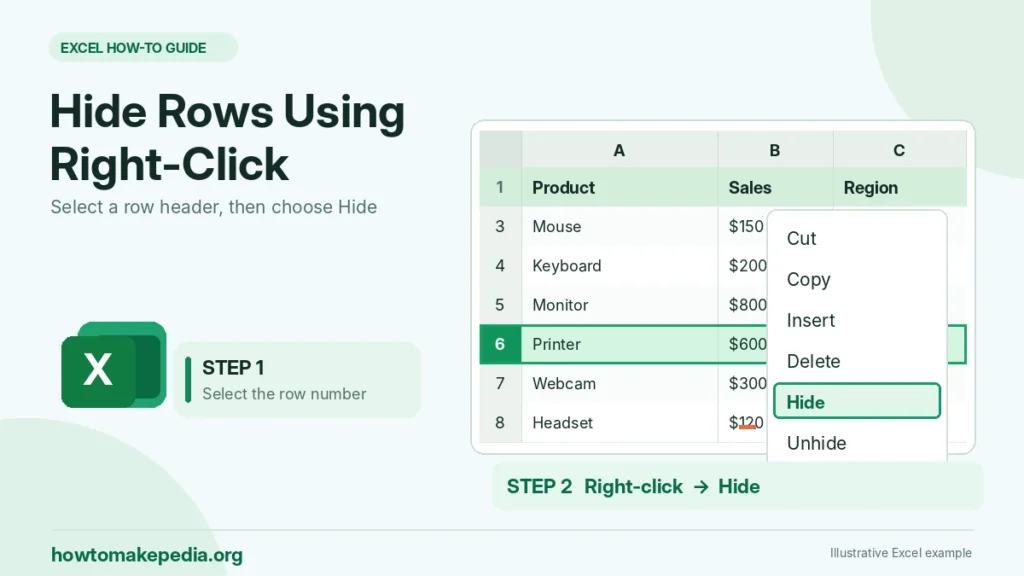
Right-clicking is the easiest method for most beginners. It works well when you need to hide one row or several rows manually.
Step-by-Step Instructions
- Open your Microsoft Excel workbook.
- Find the row you want to hide.
- Click the row number on the left side of the worksheet.
- Right-click the selected row header.
- Choose Hide from the menu.
- Check that the selected row disappears.
Example: Hide a Row in a Sales Report
Suppose row 6 contains an internal note about a sales adjustment.
Click row number 6, right-click it, and choose Hide.
Excel now displays row 5 followed by row 7. Your note remains stored in row 6.
To restore it, select row headers 5 and 7 together, right-click the selection, and choose Unhide.
This approach is helpful when you want to temporarily remove supporting details from a report without changing the calculations.
Method 2: Hide Rows Using the Home Tab
You can also hide rows through Excel’s Ribbon.
This method is useful if you prefer working with menus rather than keyboard shortcuts.
Steps to Hide Rows Using the Ribbon
- Select the row numbers you want to hide.
- Click the Home tab.
- Find the Cells group.
- Select Format.
- Open Hide & Unhide.
- Choose Hide Rows.
The selected rows disappear immediately.
To restore them, select the surrounding rows and return to Home > Format > Hide & Unhide > Unhide Rows.
Method 3: Hide Rows in Excel Using a Keyboard Shortcut
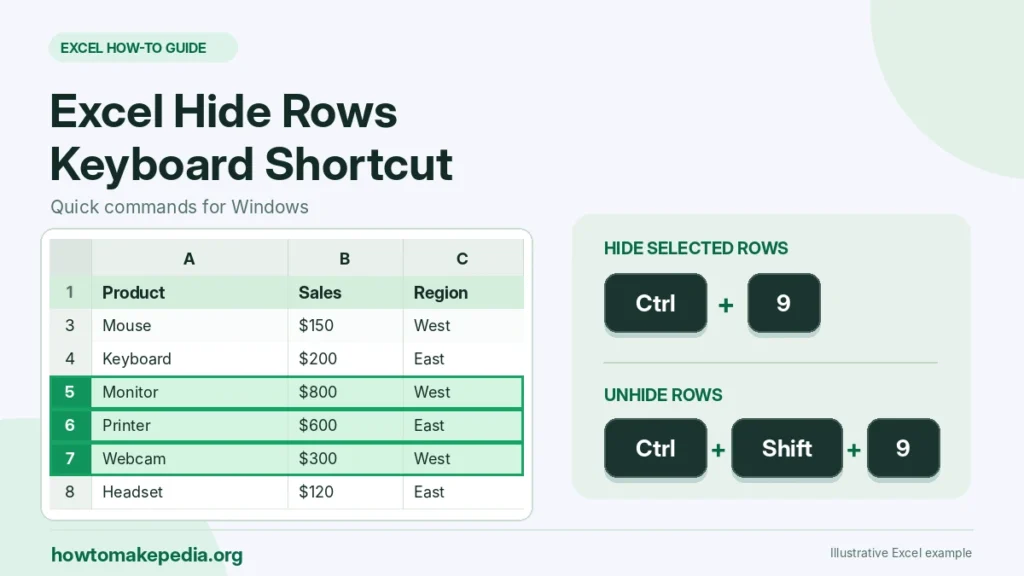
If you frequently work with large spreadsheets, keyboard shortcuts can save time.
On Windows, the shortcut for hiding selected rows is:
Ctrl + 9
How to Use the Shortcut
- Select the row or rows you want to hide.
- Press Ctrl + 9.
- Check that the selected rows are no longer visible.
For example, select rows 8 through 12 and press Ctrl + 9. All five rows disappear from view.
To unhide them, select the visible row headers surrounding the hidden range and press Ctrl + Shift + 9.
Excel Hide and Unhide Shortcuts
| Action | Windows Shortcut |
|---|---|
| Hide selected rows | Ctrl + 9 |
| Unhide selected rows | Ctrl + Shift + 9 |
| Select entire row | Shift + Spacebar |
| Hide selected columns | Ctrl + 0 |
These shortcuts apply to supported Windows desktop versions of Excel. Mac and browser shortcuts may differ.
How to Hide Multiple Rows in Excel
You don’t need to hide rows one at a time. Excel lets you select entire groups of rows before applying the Hide command.
Hide Consecutive Rows
To hide rows 5 through 10:
- Click row number 5.
- Hold Shift.
- Click row number 10.
- Right-click the selected headers.
- Choose Hide.
Alternatively, drag your mouse across row headers 5 through 10.
After hiding them, row 4 is followed by row 11.
Hide Nonadjacent Rows
Sometimes you need to hide rows that aren’t next to each other.
On Windows:
- Click the first row number.
- Hold Ctrl.
- Click other row numbers you want to hide.
- Release Ctrl.
- Right-click one of the selected row headers and choose Hide.
For example, you can hide rows 3, 7, and 12 without hiding the rows between them.
On Mac, use Command while selecting separate row headers.
Hide a Large Range of Rows
For a large range, the Name Box can make selection easier.
- Find the Name Box to the left of the formula bar.
- Type a range such as
5:100. - Press Enter.
- Go to Home > Format > Hide & Unhide > Hide Rows.
This selects and hides rows 5 through 100 without requiring you to scroll through the worksheet.
How to Hide Rows in Excel on Mac
Excel for Mac supports the same basic row-hiding feature, although some keyboard commands differ.
Hide Rows With a Mouse or Trackpad
- Open the workbook in Excel for Mac.
- Select the row numbers you want to hide.
- Right-click or use your trackpad’s secondary click.
- Choose Hide.
You can also use Home > Format > Hide & Unhide > Hide Rows.
Microsoft documents Command + ( as a Mac shortcut for hiding selected rows and Command + Shift + ( for unhiding them. The actual keys used for the parenthesis symbol depend on your keyboard layout.
If a shortcut doesn’t work, use the right-click menu instead.
How to Hide Rows in Excel Online
Excel for the web lets you hide rows without installing the desktop application.
Steps
- Open your workbook in Excel for the web.
- Select the row numbers you want to hide.
- Right-click the selected row headers.
- Choose Hide.
- Confirm that the rows disappear.
To restore them, select the row headers surrounding the missing rows, right-click, and choose Unhide Rows.
Some menu labels and shortcuts depend on your browser and Excel interface. The right-click method is generally the clearest option.
How to Unhide Rows in Excel

If row numbers jump unexpectedly, some rows may be hidden.
Suppose your worksheet shows row 4 followed by row 9. Rows 5 through 8 may be hidden.
Method 1: Unhide Rows With Right-Click
- Select row headers 4 through 9, including the visible rows surrounding the gap.
- Right-click the selection.
- Choose Unhide.
Rows 5, 6, 7, and 8 should reappear.
You can also double-click the boundary between the visible row headers where Excel indicates hidden rows.
Method 2: Unhide Using the Home Tab
- Select the range containing the hidden rows.
- Open Home.
- Choose Format.
- Select Hide & Unhide.
- Click Unhide Rows.
Method 3: Use a Keyboard Shortcut
On Windows, select the relevant row range and press:
Ctrl + Shift + 9
Make sure your selection includes the hidden rows. Selecting an unrelated row won’t reveal the missing data.
How to Unhide All Rows in Excel
If many rows are hidden throughout a worksheet, restoring them individually can be inconvenient.
Here’s how to reveal them all:
- Click the Select All button at the upper-left corner of the worksheet, between the row numbers and column letters.
- Open the Home tab.
- Select Format.
- Choose Hide & Unhide.
- Click Unhide Rows.
Excel restores manually hidden rows throughout the selected worksheet.
Tip: This may reveal rows that were intentionally hidden for report formatting. Active filters or collapsed groups may still need to be cleared or expanded separately.
How to Unhide the First Row in Excel
Row 1 can be difficult to restore because there’s no visible row above it.
Microsoft recommends using the Name Box to select the first cell.
Steps to Restore Row 1
- Locate the Name Box beside the formula bar.
- Type
A1. - Press Enter.
- Open Home > Format.
- Choose Hide & Unhide > Unhide Rows.
Row 1 should become visible again.
If necessary, select A1 and use Home > Format > Row Height to assign a positive height, such as 15.
How to Hide Blank Rows in Excel
Blank rows can make a spreadsheet harder to read, especially when reviewing long lists.
You can hide them manually or use filtering.
Option 1: Hide Blank Rows Manually
Select the row headers for the blank rows, right-click, and choose Hide.
This works well when you have only a few empty rows.
Option 2: Filter Out Blank Records
If you have a table containing names, dates, and sales amounts:
- Select a cell inside the table.
- Open Data > Filter.
- Click the filter arrow in the column you’re checking.
- Deselect (Blanks) while keeping the values you want visible.
- Click OK.
Excel displays rows that meet the filter criteria.
Filtering by one column’s blanks doesn’t necessarily find completely empty rows. A record may have a blank cell in that column but contain important information elsewhere.
Don’t permanently delete blank rows until you’ve checked whether they separate report sections or serve another purpose.
How to Hide Rows Based on Cell Values
Suppose you manage a task tracker with three columns:
| Task | Owner | Status |
|---|---|---|
| Update website | Emma | Completed |
| Review invoices | James | Pending |
| Send report | Olivia | Completed |
| Check inventory | Noah | In Progress |
You want to temporarily hide completed tasks so you can focus on unfinished work.
Use Excel Filters
- Click any cell inside the task tracker.
- Go to Data > Filter.
- Open the dropdown arrow in the Status column.
- Uncheck Completed.
- Leave Pending and In Progress selected.
- Click OK.
Only unfinished tasks remain visible.
To display every task again, clear the Status filter.
This method is easier to maintain than manually hiding each completed task.
For advanced automation, VBA can change row visibility based on values. However, ordinary filtering is usually a better starting point for beginners because it doesn’t require writing or maintaining code.
Hide Rows vs. Filter Rows vs. Group Rows

Excel provides several ways to reduce the information displayed in a worksheet.
| Method | What It Does | Best Use | How to Restore |
|---|---|---|---|
| Hide Rows | Conceals selected rows | Temporary manual cleanup | Unhide |
| Filter Rows | Displays records matching criteria | Status lists and large tables | Clear Filter |
| Group Rows | Creates expandable sections | Detailed reports | Expand the group |
Choose manual hiding when you know exactly which rows should disappear.
Use filters when visibility depends on a value, such as status, date, or sales amount.
Use grouping when you frequently need to collapse and expand supporting information.
How to Group Rows in Excel
Grouping is especially useful for financial reports and worksheets with multiple levels of detail.
To group rows:
- Select the rows containing supporting information.
- Open the Data tab.
- Find the Outline group.
- Click Group.
- Use the outline minus and plus controls to collapse or expand the section.
Unlike deleting rows, grouping preserves the information and provides a convenient way to change how much detail appears.
Does Hiding Rows Affect Excel Formulas?
Hiding rows doesn’t remove their values from ordinary calculations.
For example, this formula adds numbers in cells B2 through B10:
=SUM(B2:B10)
If row 5 is manually hidden, the SUM formula still includes its value.
If you want a total that excludes manually hidden rows, use:
=SUBTOTAL(109,B2:B10)
Here, 109 tells Excel to calculate a SUM subtotal while ignoring manually hidden rows.
The distinction matters when you’re preparing reports based only on visible records.
SUBTOTAL also excludes filtered-out rows. In contrast, ordinary SUM doesn’t automatically ignore values simply because their rows are hidden.
Hidden rows are generally omitted from the printed worksheet.
This can be useful when preparing a report that contains supporting calculations or internal notes.
Before printing:
- Open File > Print.
- Review the Print Preview.
- Confirm which records are visible.
- Unhide important rows if the printed report needs to include them.
Remember that hiding a row changes its appearance in the report, not the underlying workbook data.
Why Can’t I Unhide Rows in Excel?
Sometimes rows remain invisible even after you select Unhide.
Here are the most common reasons and how to fix them.
1. The Wrong Rows Are Selected
Select the visible row headers directly above and below the missing rows, then try Unhide again.
2. Row Height Is Set to Zero
A zero-height row may appear hidden.
Select the affected range, open Home > Format > Row Height, and enter a positive number, such as 15.
3. A Filter Is Active
If rows are hidden by filtering, the Unhide command may not restore them.
Go to Data > Clear to remove active filtering criteria.
4. Rows Are Collapsed in a Group
Look for outline controls beside the row numbers.
Click the plus symbol to expand the collapsed group.
5. The Worksheet Is Protected
Worksheet protection can prevent changes to row formatting.
If you have permission, check Review > Unprotect Sheet. You may need the password supplied by the workbook owner.
Use the Name Box to select A1, then choose Home > Format > Hide & Unhide > Unhide Rows.
7. The Keyboard Shortcut Doesn’t Work
Check that you’re using the correct shortcut for Windows or Mac and that the appropriate rows are selected.
You can always use the Ribbon or right-click menu instead.
Is Hiding Rows a Secure Way to Protect Information?
No. Hiding rows is a display feature, not a security feature.
Someone with sufficient access to your workbook may be able to reveal hidden rows and read their contents.
Don’t rely on hiding rows to protect passwords, personal records, confidential financial information, or other sensitive data.
For shared files, remove information recipients shouldn’t access or use appropriate file permissions and access controls.
Worksheet protection can restrict certain editing actions, but it shouldn’t be treated as a substitute for proper data security.
Common Mistakes When Hiding Rows in Excel
Avoid these common problems:
- Deleting instead of hiding: Use Hide when the data may be needed later.
- Selecting the wrong rows: Check the row numbers before making changes.
- Using an incorrect shortcut: Windows and Mac commands can differ.
- Forgetting hidden data: Review hidden sections before sharing a workbook.
- Confusing filters with hidden rows: Clear filters when records disappear unexpectedly.
- Assuming formulas ignore hidden values: Check whether your calculation uses SUM or SUBTOTAL.
- Assuming hidden data is private: Remove sensitive information before sharing.
When cleaning a spreadsheet, you may also need to remove duplicate records in Excel. Unlike hiding rows, deleting duplicates changes the underlying dataset, so review your records carefully first.
Frequently Asked Questions
What is the fastest way to hide rows in Excel?
Select the row headers, right-click, and choose Hide. On Windows, Ctrl + 9 is a convenient shortcut.
How do I hide several rows at once?
Select consecutive rows using Shift, or choose separate rows using Ctrl on Windows. Then right-click and select Hide.
How do I unhide all rows in Excel?
Select the entire worksheet and choose Home > Format > Hide & Unhide > Unhide Rows.
Can I hide rows in Excel on Mac?
Yes. Select the relevant row headers, use a secondary click, and choose Hide. Excel for Mac also supports keyboard shortcuts.
Can Excel automatically hide completed tasks?
You can use a filter to exclude rows marked Completed. VBA is another option when you need programmed row-hiding behavior.
Does hiding a row delete its contents?
No. Hidden rows retain their data, formatting, and formulas.
Why won’t Excel unhide my rows?
Check for active filters, zero row heights, collapsed groups, worksheet protection, or incorrect row selection.
Yes. Someone with sufficient workbook access can usually unhide them. Hidden rows aren’t a privacy safeguard.
Conclusion
Hiding rows in Excel is a simple way to keep worksheets organized without deleting useful information. Right-clicking the selected row headers and choosing Hide is the easiest method, while Ctrl + 9 offers a faster option on Windows.
You can restore hidden rows with Unhide whenever they’re needed. For lists that change frequently, filtering may be more practical than manual hiding. Choose the method that keeps your worksheet clear without losing important data.

6 Comments
Pingback: How to Move Columns in Excel: 3 Easy Methods
Pingback: How to Disable Scroll Lock in Excel (Easy Fixes)
Pingback: How to Hide Columns in Excel: 5 Easy Methods
Pingback: How to Unhide Columns in Excel: 6 Easy Methods
Pingback: How to Password Protect an Excel File (Windows & Mac)
Pingback: How to Group Rows in Excel: Easy Steps & Shortcuts