


If you need to combine multiple Excel files into one worksheet, Power Query is usually the best option. It can collect data from several workbooks, combine their records into one table, and refresh the results when your source files change.
For smaller tasks, you can copy and paste records manually. If you want to keep each worksheet separate, Excel’s Move or Copy feature is another practical choice.
Quick Answer: How to Combine Multiple Excel Files
To combine Excel files using Power Query:
- Place all your Excel files in one folder.
- Open a new, blank Excel workbook.
- Go to Data > Get Data > From File > From Folder.
- Select the folder containing your files.
- Choose Combine > Combine & Transform Data.
- Select the correct worksheet or table from the sample workbook.
- Review the columns and click Close & Load.
Excel creates a combined table containing records from your source files.
You can update the combined data later by selecting Data > Refresh All, provided the source files and folder remain accessible.
What Does Combining Multiple Excel Files Mean?
Combining Excel files can mean different things depending on how you want your finished workbook organized.
| Goal | Recommended Method |
|---|---|
| Combine records into one worksheet | Power Query |
| Combine a few small datasets | Copy and paste |
| Keep worksheets as separate tabs | Move or Copy Sheet |
| Match records using a common ID | Power Query Merge |
For example, you might want to combine January, February, and March sales reports into one master table.
Alternatively, you might want a single workbook containing three separate tabs named January, February, and March.
These are different tasks, so choosing the right method will save you time.
Before Combining Excel Files: Prepare Your Data
A little preparation can prevent missing records, duplicate headings, and import errors.
Start by saving backup copies of your original Excel workbooks. Then place the files you want to combine in a dedicated folder.
Check that the source workbooks have:
- Consistent column names.
- Compatible date, text, and number formats.
- The expected worksheet or Excel Table.
- No unnecessary blank rows or repeated header rows.
- No unrelated worksheets or files that might be imported accidentally.
For example, if one workbook uses the heading Order ID and another uses Order Number, Power Query may not interpret those fields as equivalent.
Standardize the headings before combining the files, or adjust their transformation steps.
You should also keep the destination workbook outside the source folder. Otherwise, Power Query might include the output file when refreshing the folder.
Method 1: Combine Multiple Excel Files Using Power Query
Power Query works well when several workbooks contain similar information, especially recurring monthly reports.
Example: Combining Three Monthly Sales Files
Suppose you have these Excel workbooks:
| Workbook | Number of Sales Records |
|---|---|
| January.xlsx | 3 |
| February.xlsx | 4 |
| March.xlsx | 3 |
| Total | 10 |
Each workbook contains four columns:
Date, Order ID, Product, and Amount.
Your goal is to combine all 10 sales records into one worksheet.
Step 1: Put All Excel Files in One Folder
Create a folder called Monthly Sales Reports.
Move January.xlsx, February.xlsx, and March.xlsx into that folder.
Avoid including unrelated workbooks, backup copies, or temporary Excel files.
Step 2: Open a Blank Excel Workbook
Open Microsoft Excel and create a new workbook.
This will become your master report.
Save it somewhere outside your source folder, such as in a separate Reports directory.
Step 3: Import the Folder
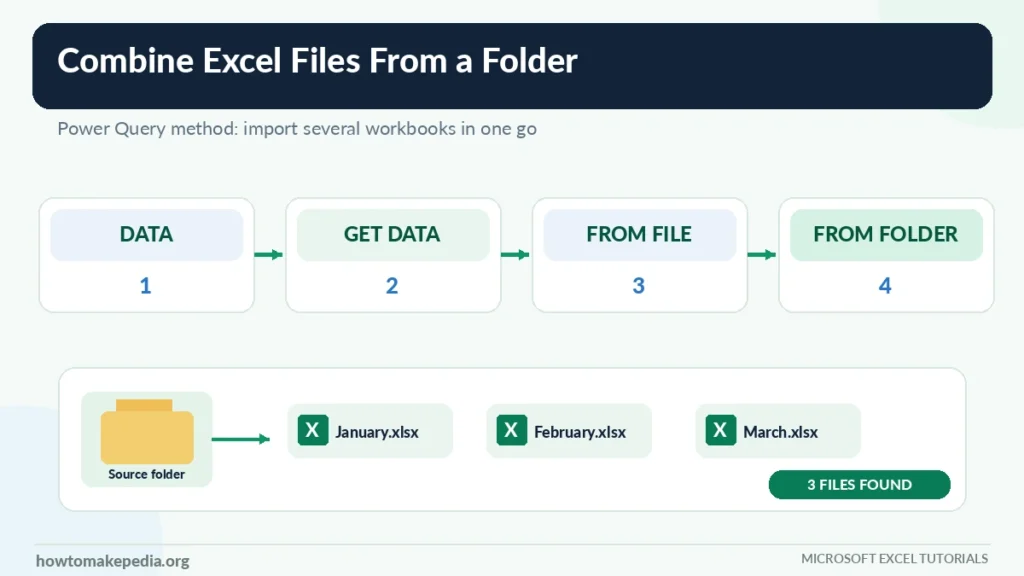
In a supported version of Excel for Windows:
- Select the Data tab.
- Click Get Data.
- Select From File.
- Choose From Folder.
- Browse to your Monthly Sales Reports folder.
- Confirm your selection.
Excel displays information about the files it finds in that folder.
Step 4: Verify the File List
Review the file preview before combining anything.
You should see January.xlsx, February.xlsx, and March.xlsx.
Depending on the interface, the preview may include file names, extensions, folder paths, and modified dates.
If you see extra files, remove them from the folder or use Power Query filters to exclude them.
Step 5: Choose Combine & Transform Data
Select Combine > Combine & Transform Data.
This option lets you inspect and clean the information before loading it into the destination worksheet.
It’s generally preferable to loading the results immediately when you’re working with unfamiliar source files.
Step 6: Select the Sample Workbook and Worksheet

Excel displays the Combine Files dialog.
Choose a suitable sample workbook and the worksheet or Excel Table containing the sales data.
For example, select the Sales table if every workbook contains a table with that name.
The sample file helps Power Query define the transformation steps used across the other workbooks.
Make sure you’re selecting the correct data object rather than an unrelated summary sheet.
Step 7: Review the Combined Columns
Power Query Editor should display the combined data.
Check that you have the expected columns:
| Date | Order ID | Product | Amount |
|---|---|---|---|
| 01/05/2026 | JAN-101 | Notebook | 25 |
| 01/12/2026 | JAN-102 | Keyboard | 45 |
| 02/04/2026 | FEB-201 | Mouse | 20 |
These are illustrative records.
Check that dates are recognized as dates, order identifiers remain text, and amounts have an appropriate numeric data type.
Power Query can match corresponding columns by name even when their order differs, but you should still check the generated transformations.
Step 8: Keep the Source Filename
If the generated query includes a source filename column, keep it when you want to trace records back to their original workbooks.
For example:
| Source File | Order ID | Amount |
|---|---|---|
| January.xlsx | JAN-101 | 25 |
| February.xlsx | FEB-201 | 20 |
| March.xlsx | MAR-301 | 60 |
The exact name and availability of this field depend on how the query was created.
A source filename is especially helpful when investigating missing records or unexpected duplicates.
Step 9: Clean the Imported Data
Before loading your results:
- Remove genuinely empty rows.
- Check for duplicate header rows.
- Review any error values.
- Confirm your column data types.
- Remove unnecessary fields.
- Check whether any expected columns are missing.
Don’t automatically remove repeated values. Two identical amounts, for example, may represent legitimate sales.
If you prefer a different column arrangement in the finished worksheet, our guide on how to move columns in Excel explains how to safely reorganize fields without overwriting your data.
Step 10: Close & Load
After reviewing the data, select Home > Close & Load.
Power Query loads the combined results into Excel.
Save the workbook with a descriptive name, such as Master-Sales-Report.xlsx.
Step 11: Verify the Final Results

Check that the master worksheet contains 10 data records from the three monthly files.
The header row should not count as a sales record.
Review a few orders from each workbook and compare important totals against the original sources.
A successful import does not always mean every record was imported correctly.
Method 2: Combine Excel Files Manually Using Copy and Paste
If you only need to combine two or three small workbooks once, copying and pasting might be easier than setting up Power Query.
Steps to Combine Excel Files Manually
- Open the Excel workbooks containing your data.
- Create a blank destination workbook.
- Copy the headers and records from the first workbook.
- Paste them into the destination worksheet.
- Open the second source workbook.
- Copy only its data rows, excluding the header.
- Paste those rows directly below the existing records.
- Repeat for the remaining files.
- Save the destination workbook and verify the row count.
How to Avoid Duplicate Headers
Imagine your first workbook contains:
Date | Product | Amount
Your second workbook uses the same headings.
When copying the second file, don’t paste its header row again.
Otherwise, the word Amount might appear in the middle of your sales records.
Also, confirm that every workbook uses the same column arrangement before pasting. If one file lists Product before Date, the values could end up in the wrong fields.
Manual copying doesn’t create a refreshable connection. If the original files change, you’ll need to repeat the process.
Method 3: Combine Multiple Excel Files Into One Workbook With Separate Sheets
Sometimes you want every worksheet in one workbook without combining its records.
For example, you may need:
- Sheet 1: January Sales
- Sheet 2: February Sales
- Sheet 3: March Sales
Use Excel’s Move or Copy feature for this task.
Steps to Copy Worksheets Into One Workbook
- Open the source and destination workbooks in desktop Excel.
- Right-click the worksheet tab you want to copy.
- Choose Move or Copy.
- Under To book, select the destination workbook.
- Choose where the copied worksheet should appear.
- Check Create a copy.
- Click OK.
- Repeat for the remaining worksheets.
Each worksheet becomes a separate tab in the destination workbook.
Copying an entire sheet can preserve its layout and formatting, but you should review formulas, named ranges, external references, and charts afterward.
Remember that this method does not create one combined transaction table.
How to Combine Excel Files Using Append Queries
If you’ve already imported several datasets as individual Power Query queries, you can combine them with Append.
Open Power Query Editor and select:
Home > Append Queries > Append Queries as New
Choose either two tables or three or more tables, then select the queries you want to combine.
Append places records from one query below the records from another.
It matches fields by column name, not simply by position. When columns don’t match, the resulting table may contain null values in those fields.
This differs from the automated From Folder process, which applies generated sample-file transformations to your source files.
How to Combine Excel Files With Different Column Names
Different headers are a common source of combining errors.
For example:
| January Workbook | February Workbook |
|---|---|
| Order ID | Order Number |
| Product | Product |
| Amount | Sales Amount |
Although Order ID and Order Number might mean the same thing, Power Query doesn’t automatically know your business definitions.
Rename the fields consistently before appending queries or adjust the appropriate Power Query transformation steps.
Changing column order is different from changing column names. Consistent field names help prevent information from being placed into separate, unexpected columns.
How to Combine Excel Files Automatically When New Files Are Added
One advantage of Power Query is that you can refresh a combined report when your source information changes.
Suppose you have already combined January, February, and March.
When April.xlsx becomes available:
- Add April.xlsx to the same source folder.
- Confirm its structure matches the expected layout.
- Open your master workbook.
- Select Data > Refresh All.
- Wait for the query to finish.
- Check that April’s records appear in the result.
New records do not necessarily appear immediately after you add a file. The query generally needs to refresh.
If refresh fails, check the folder location, selected files, data types, and expected worksheets.
Append vs. Merge vs. Consolidate in Excel

These Excel operations solve different problems.
| Operation | What It Does | Best Use |
|---|---|---|
| Append | Stacks records vertically | Monthly sales reports |
| Merge | Joins records using matching fields | Connecting orders with customer details |
| Consolidate | Summarizes numeric values across ranges | Department totals |
For example, Append can place January’s orders below February’s orders.
Merge can connect an order table with a customer table using Customer ID.
Consolidate can calculate totals from several ranges, but it isn’t normally the right tool for preserving every individual transaction.
How to Verify That All Excel Files Were Combined Correctly
Checking the results is just as important as combining the data.
For the sample sales reports, your expected record count is:
3 January records + 4 February records + 3 March records = 10 records.
Review the following:
- Confirm all three source workbooks were included.
- Check the total number of records.
- Compare headers with the original files.
- Verify dates, identifiers, and numeric values.
- Look for unexpected blank cells.
- Check for duplicate headers and transactions.
- Compare sales totals with the source reports.
If duplicate records appear, first determine whether they’re genuine repeated transactions or accidental imports.
Our tutorial on how to remove duplicates in Excel explains how to identify and safely clean repeated entries.
You can also improve the appearance of lengthy headers by following our guide on how to wrap text in Excel.
Why Won’t Power Query Combine My Excel Files?
Several common issues can prevent a successful import.
1. Column Headers Don’t Match
Standardize your field names or correct the transformation steps.
2. A Worksheet Is Missing
Check that every workbook contains the expected sheet or Excel Table.
3. Some Columns Are Missing
Inspect the sample-file transformations. A field introduced in another workbook may not automatically appear in the final output.
4. Data Types Cause Errors
Verify that date, number, and text columns use compatible types. Preserve leading zeros in identifiers by treating them as text where appropriate.
5. Duplicate Headers Appear
Check whether headings were accidentally included as normal data rows.
Filter the file extension, folder path, or name before combining. Exclude temporary Excel files, including those beginning with ~$.
7. New Files Don’t Appear After Refresh
Confirm the new workbook is in the correct folder, matches the expected structure, and isn’t excluded by a filter.
8. The Source Folder Was Moved
Update the query’s data source path and refresh again.
9. Password-Protected Files Cause Errors
Confirm you have legitimate access and that the connector can read the protected source.
10. The Combined Table Is Too Large
A standard Excel worksheet supports a maximum of 1,048,576 rows, including any header row.
For larger datasets, consider an appropriate Data Model or another supported storage and analysis method.
How to Combine Multiple Excel Files on Mac
Excel for Mac supports Power Query capabilities, but the available connectors and commands depend on the version.
Check whether your installation supports the source type you need.
If folder-based importing isn’t available, you can use manual copying or supported worksheet-copying commands.
Avoid assuming that the Windows ribbon instructions appear exactly the same on every Mac installation.
Can You Combine Excel Files in Excel for the Web?
Excel for the web supports Power Query functionality in eligible Microsoft 365 environments.
Depending on your subscription and supported connectors, you may be able to import, edit, and refresh queries.
However, the Windows desktop From Folder workflow for local files isn’t necessarily available in the browser.
For a local folder containing several Excel workbooks, desktop Excel for Windows is generally the simpler option.
Which Method Is Best for Combining Excel Files?
| Method | Best For | Refreshable? |
|---|---|---|
| Power Query From Folder | Recurring reports | Yes |
| Manual Copy and Paste | Small, one-time tasks | No |
| Move or Copy Sheet | Separate worksheet tabs | No combined-data query |
| Append Queries | Existing imported queries | Yes |
For regularly updated reports with consistent columns, Power Query is the strongest choice.
For two small workbooks, manual copying may be faster.
When your goal is to collect original worksheets into one workbook, Move or Copy Sheet is more suitable.
Frequently Asked Questions
How do I combine multiple Excel files into one?
Use Power Query’s From Folder feature to combine similarly structured files into one table. For small datasets, you can also copy and paste their records manually.
Can I combine multiple Excel files into one worksheet?
Yes. Power Query can append records from multiple compatible workbooks into a single worksheet.
Can I combine Excel files without Power Query?
Yes. Open the source workbooks, copy their data, and paste the records into one destination worksheet, leaving out repeated headers.
Do all Excel files need identical column names?
For a straightforward folder combination, consistent headers are strongly recommended. Ordinary Append Queries can include unmatched fields, but you should review the resulting columns.
Can Power Query handle different column orders?
Yes, corresponding columns can be matched by their names rather than their positions. Still, inspect the generated transformations.
How do I avoid duplicate headers?
Use correctly structured source tables or ensure that each source’s headings are promoted as headers rather than imported as data rows.
Can I combine Excel files into separate tabs?
Yes. Use the Move or Copy command to copy worksheets into a destination workbook.
Will newly added Excel files combine automatically?
A folder-based Power Query can include new compatible source files on refresh. Adding files alone doesn’t guarantee an immediate worksheet update.
How do I track which workbook a record came from?
Keep a source filename field in your Power Query output when the generated query provides one.
What is the difference between Append and Merge?
Append stacks records vertically. Merge joins related datasets using matching key values.
Does combining files delete the originals?
Power Query generally reads and transforms source data without directly changing the original workbooks. Manual editing is different, so keep backups.
What happens if my combined data exceeds Excel’s row limit?
You cannot load more than 1,048,576 rows into one standard worksheet. Use a suitable alternative, such as a supported Data Model workflow, when your dataset is larger.
Conclusion
Combining multiple Excel files becomes much easier when you choose the method that matches your goal. Power Query is ideal for recurring reports, manual copying works for smaller tasks, and Move or Copy Sheet keeps worksheets in separate tabs.
Before finishing, check your column headings, source records, data types, and totals. For Power Query reports, verify that refresh works correctly so your master workbook stays accurate as new data arrives.
